12.4.0
Personalized Storefront - A Smarter, More Dynamic Course Catalog
We are thrilled to unveil our new, personalized Storefront. This substantial upgrade replaces the conventional course catalog and offers a more engaging, customizable, and user-centric experience for both new visitors and registered users.
The Storefront serves as a curated platform where you can showcase your training portfolio. It offers a flexible format that aligns with your brand, audience, and training objectives. Whether you aim to promote customer onboarding, introduce new offerings, or guide partners to specific content, the Storefront empowers you to transform learning into a personalized experience.
With support for banners, featured rows, carousels, text blocks, and audience-based targeting, you can envision it as your personalized branded training hub. This hub can be designed to be clean and simple, vibrant and promotional, or anything in between, catering to the preferences of each visitor.
A new user experience for learners
Learners can now access the storefront directly from the main menu, eliminating the previous limitation of viewing the catalog only at the bottom of their dashboard. If enabled, a “Storefront” icon appears in the main menu, accompanied by a subtle notification until the user visits it for the first time.
The storefront can be displayed to both registered and unregistered users, depending on your configuration - use it to:
- Promote your latest courses and upcoming events
- Highlight content by role, region, or organization and more
- Create tailored entry points for partners or customer groups
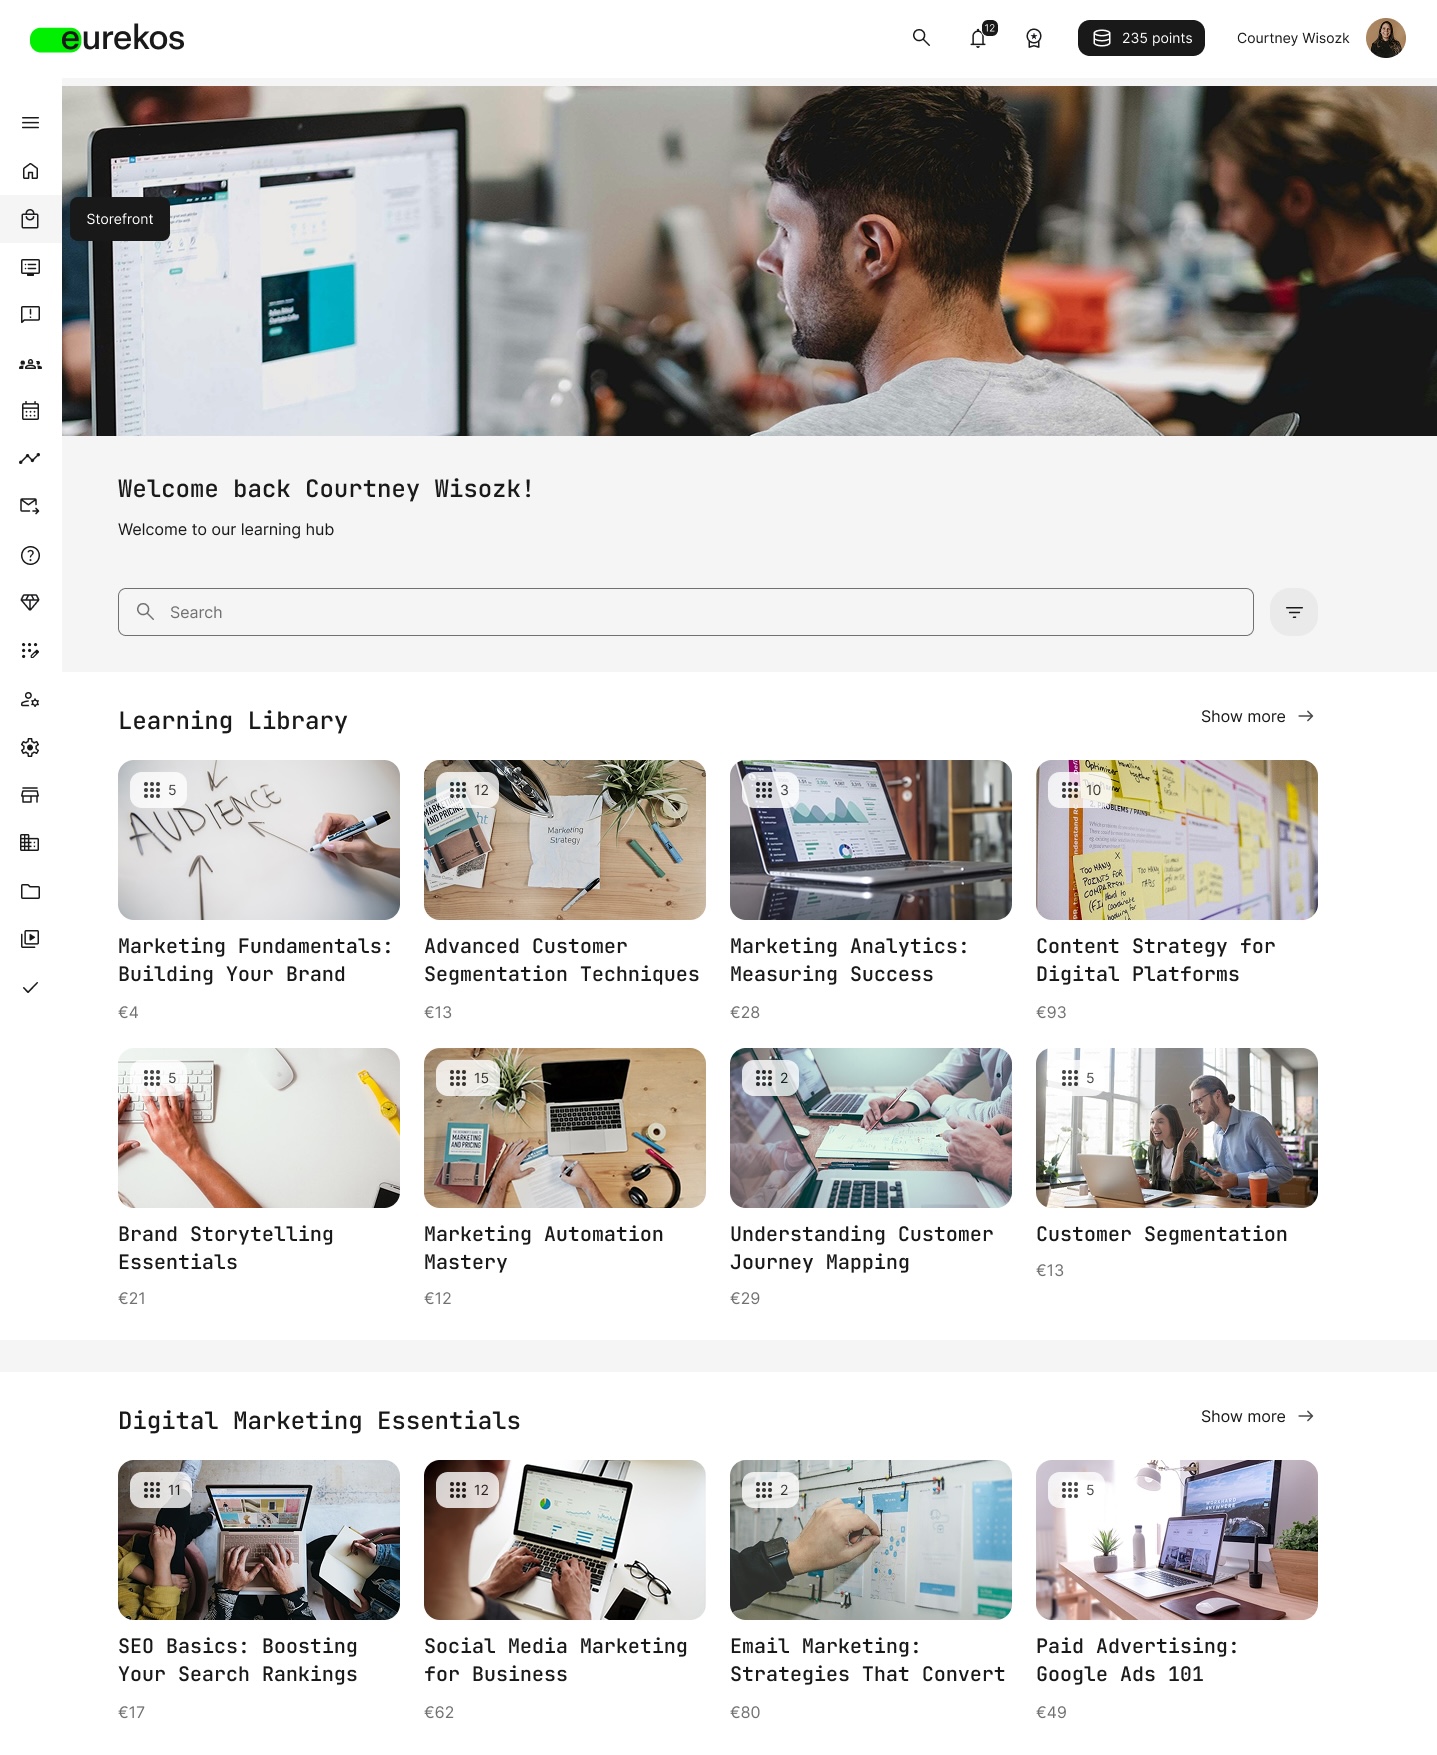
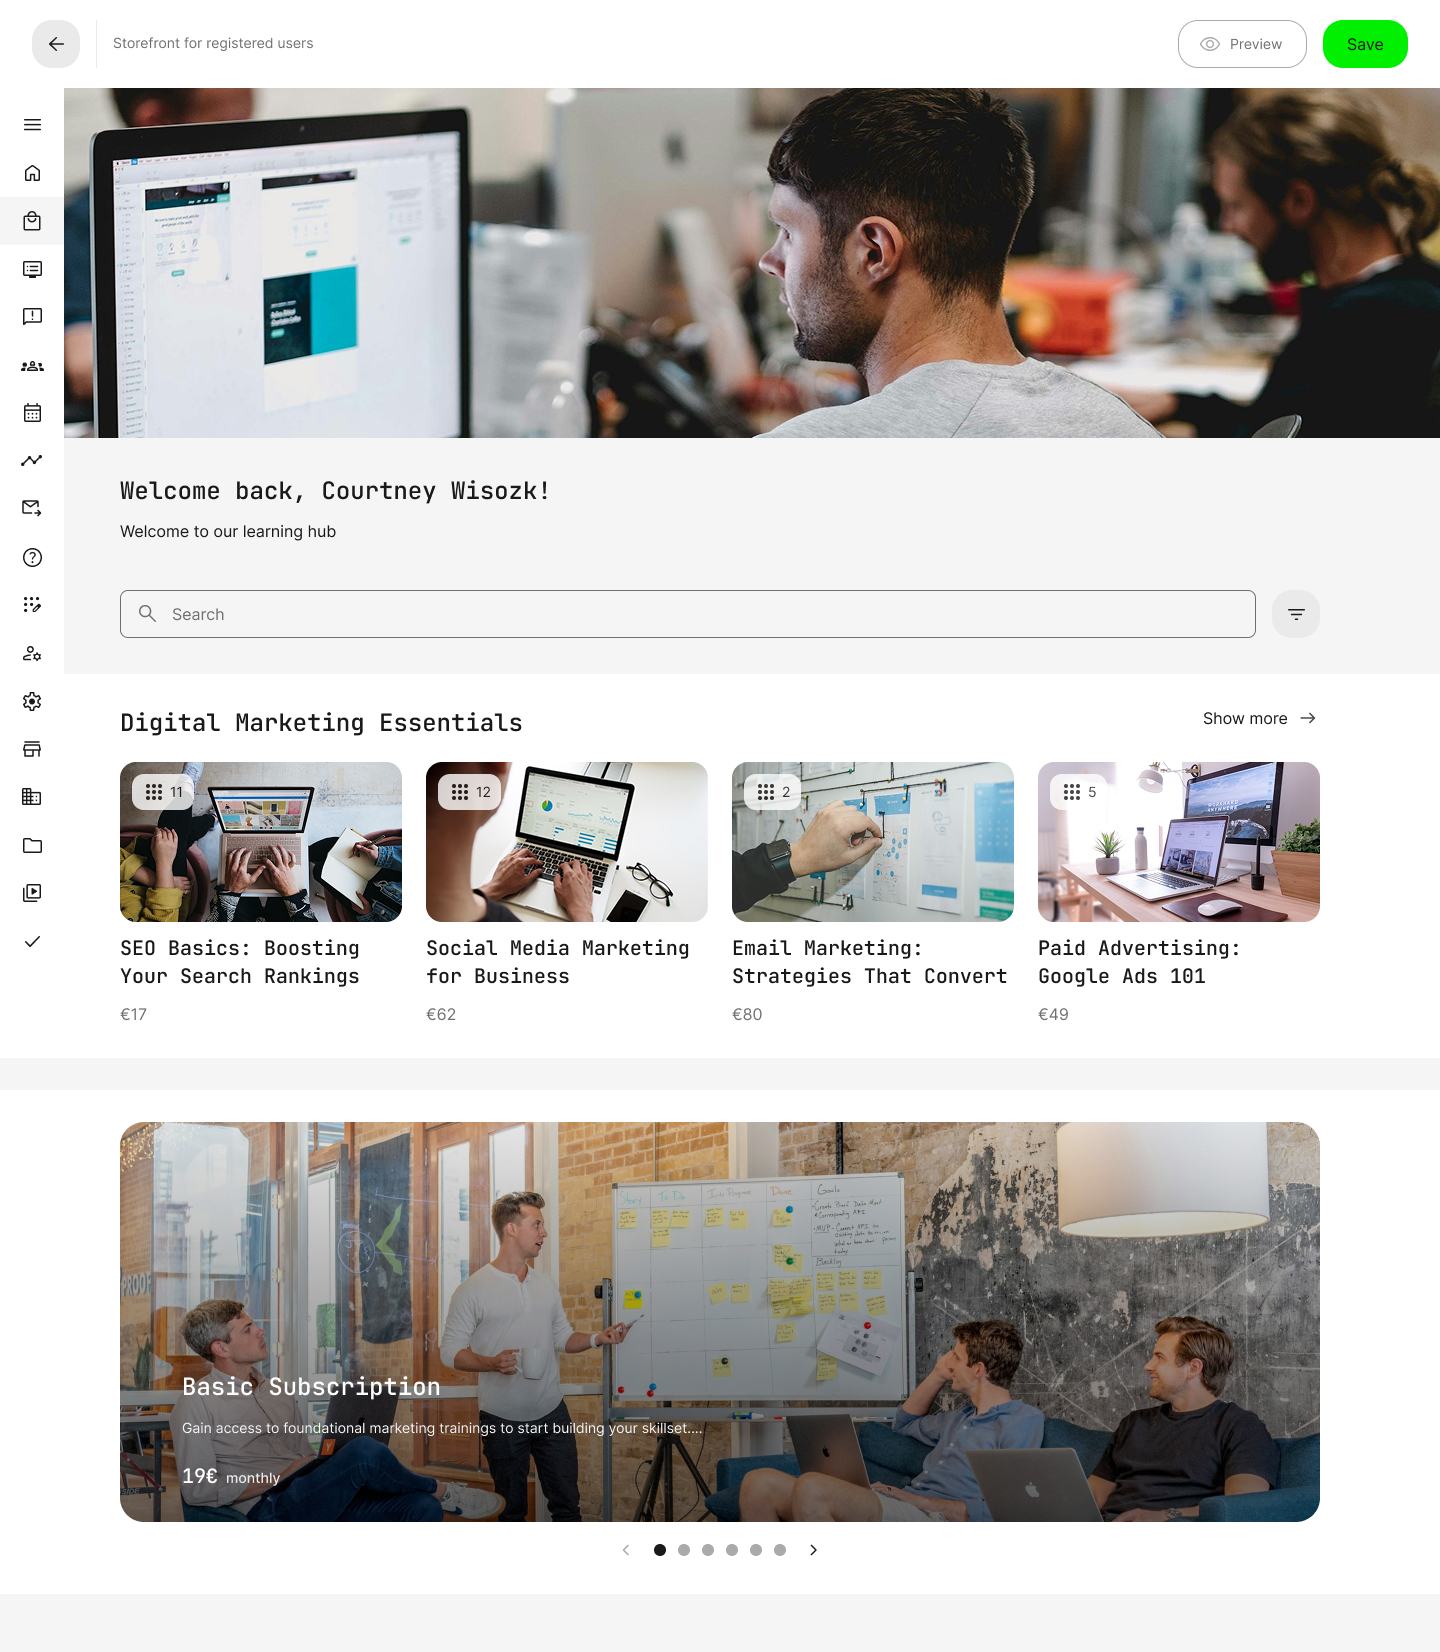
The new Storefront replaces the old catalog experience with a fully branded, personalized learning hub. It features banners, content rows, and customizable layouts for different audiences.
Full Control for Administrators
With the Storefront enabled from your platform’s general settings, you can set up and manage your storefront by navigating to Settings > Storefront. From here, you can manage three key areas:
- Registered Users: Design a personalized Storefront with dynamic sections based on tags, geography, organization, and more.
- Unregistered Users: Design a public Storefront for visitors - highlight selected courses, campaigns, or events to drive conversion and engagement.
- Appearance Settings: Define universal design rules to ensure that storefront visuals align with your brand identity. Options include:
- Background type (color or image)
- Row padding and color
- Spacing margin between sections
Both Storefronts share the same design interface, but unregistered users can only be targeted by browser language or organization (e.g., custom organization URLs). Registered users, on the other hand, enable deeper segmentation using full profile attributes and tags.
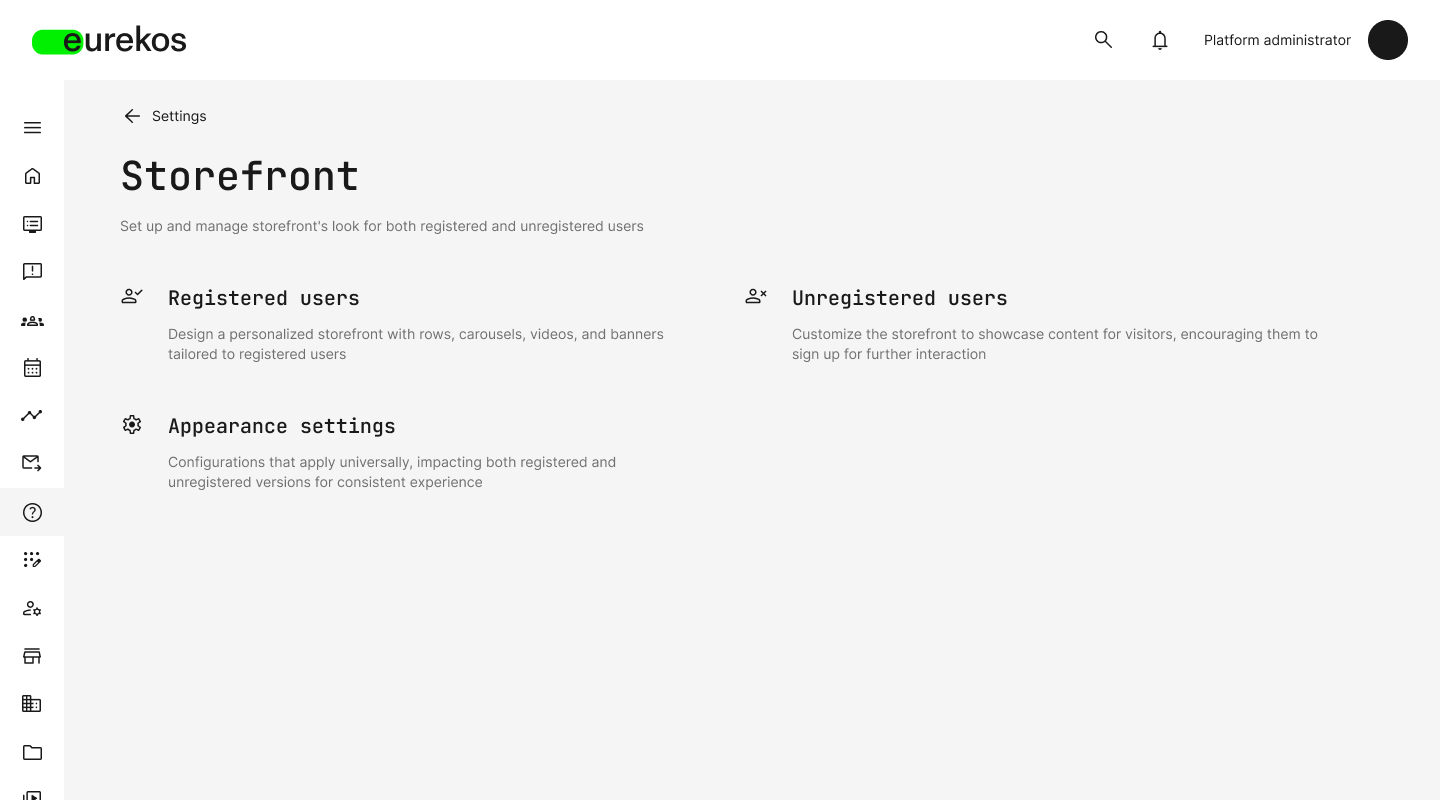
Admins can configure separate Storefronts for registered and unregistered users, along with global appearance settings for a consistent branded experience..
Layout and Content Options
Each Storefront is composed of customizable content sections - the building blocks of your personalized training catalog. You can add:
- Rows of Training Activities (see next section)
- Banners with an image or video
- Text blocks with rich formatting
- Carousels for featured training activities & subscriptions (see subscriptions further below in this article)
- Search bar (available once per storefront)
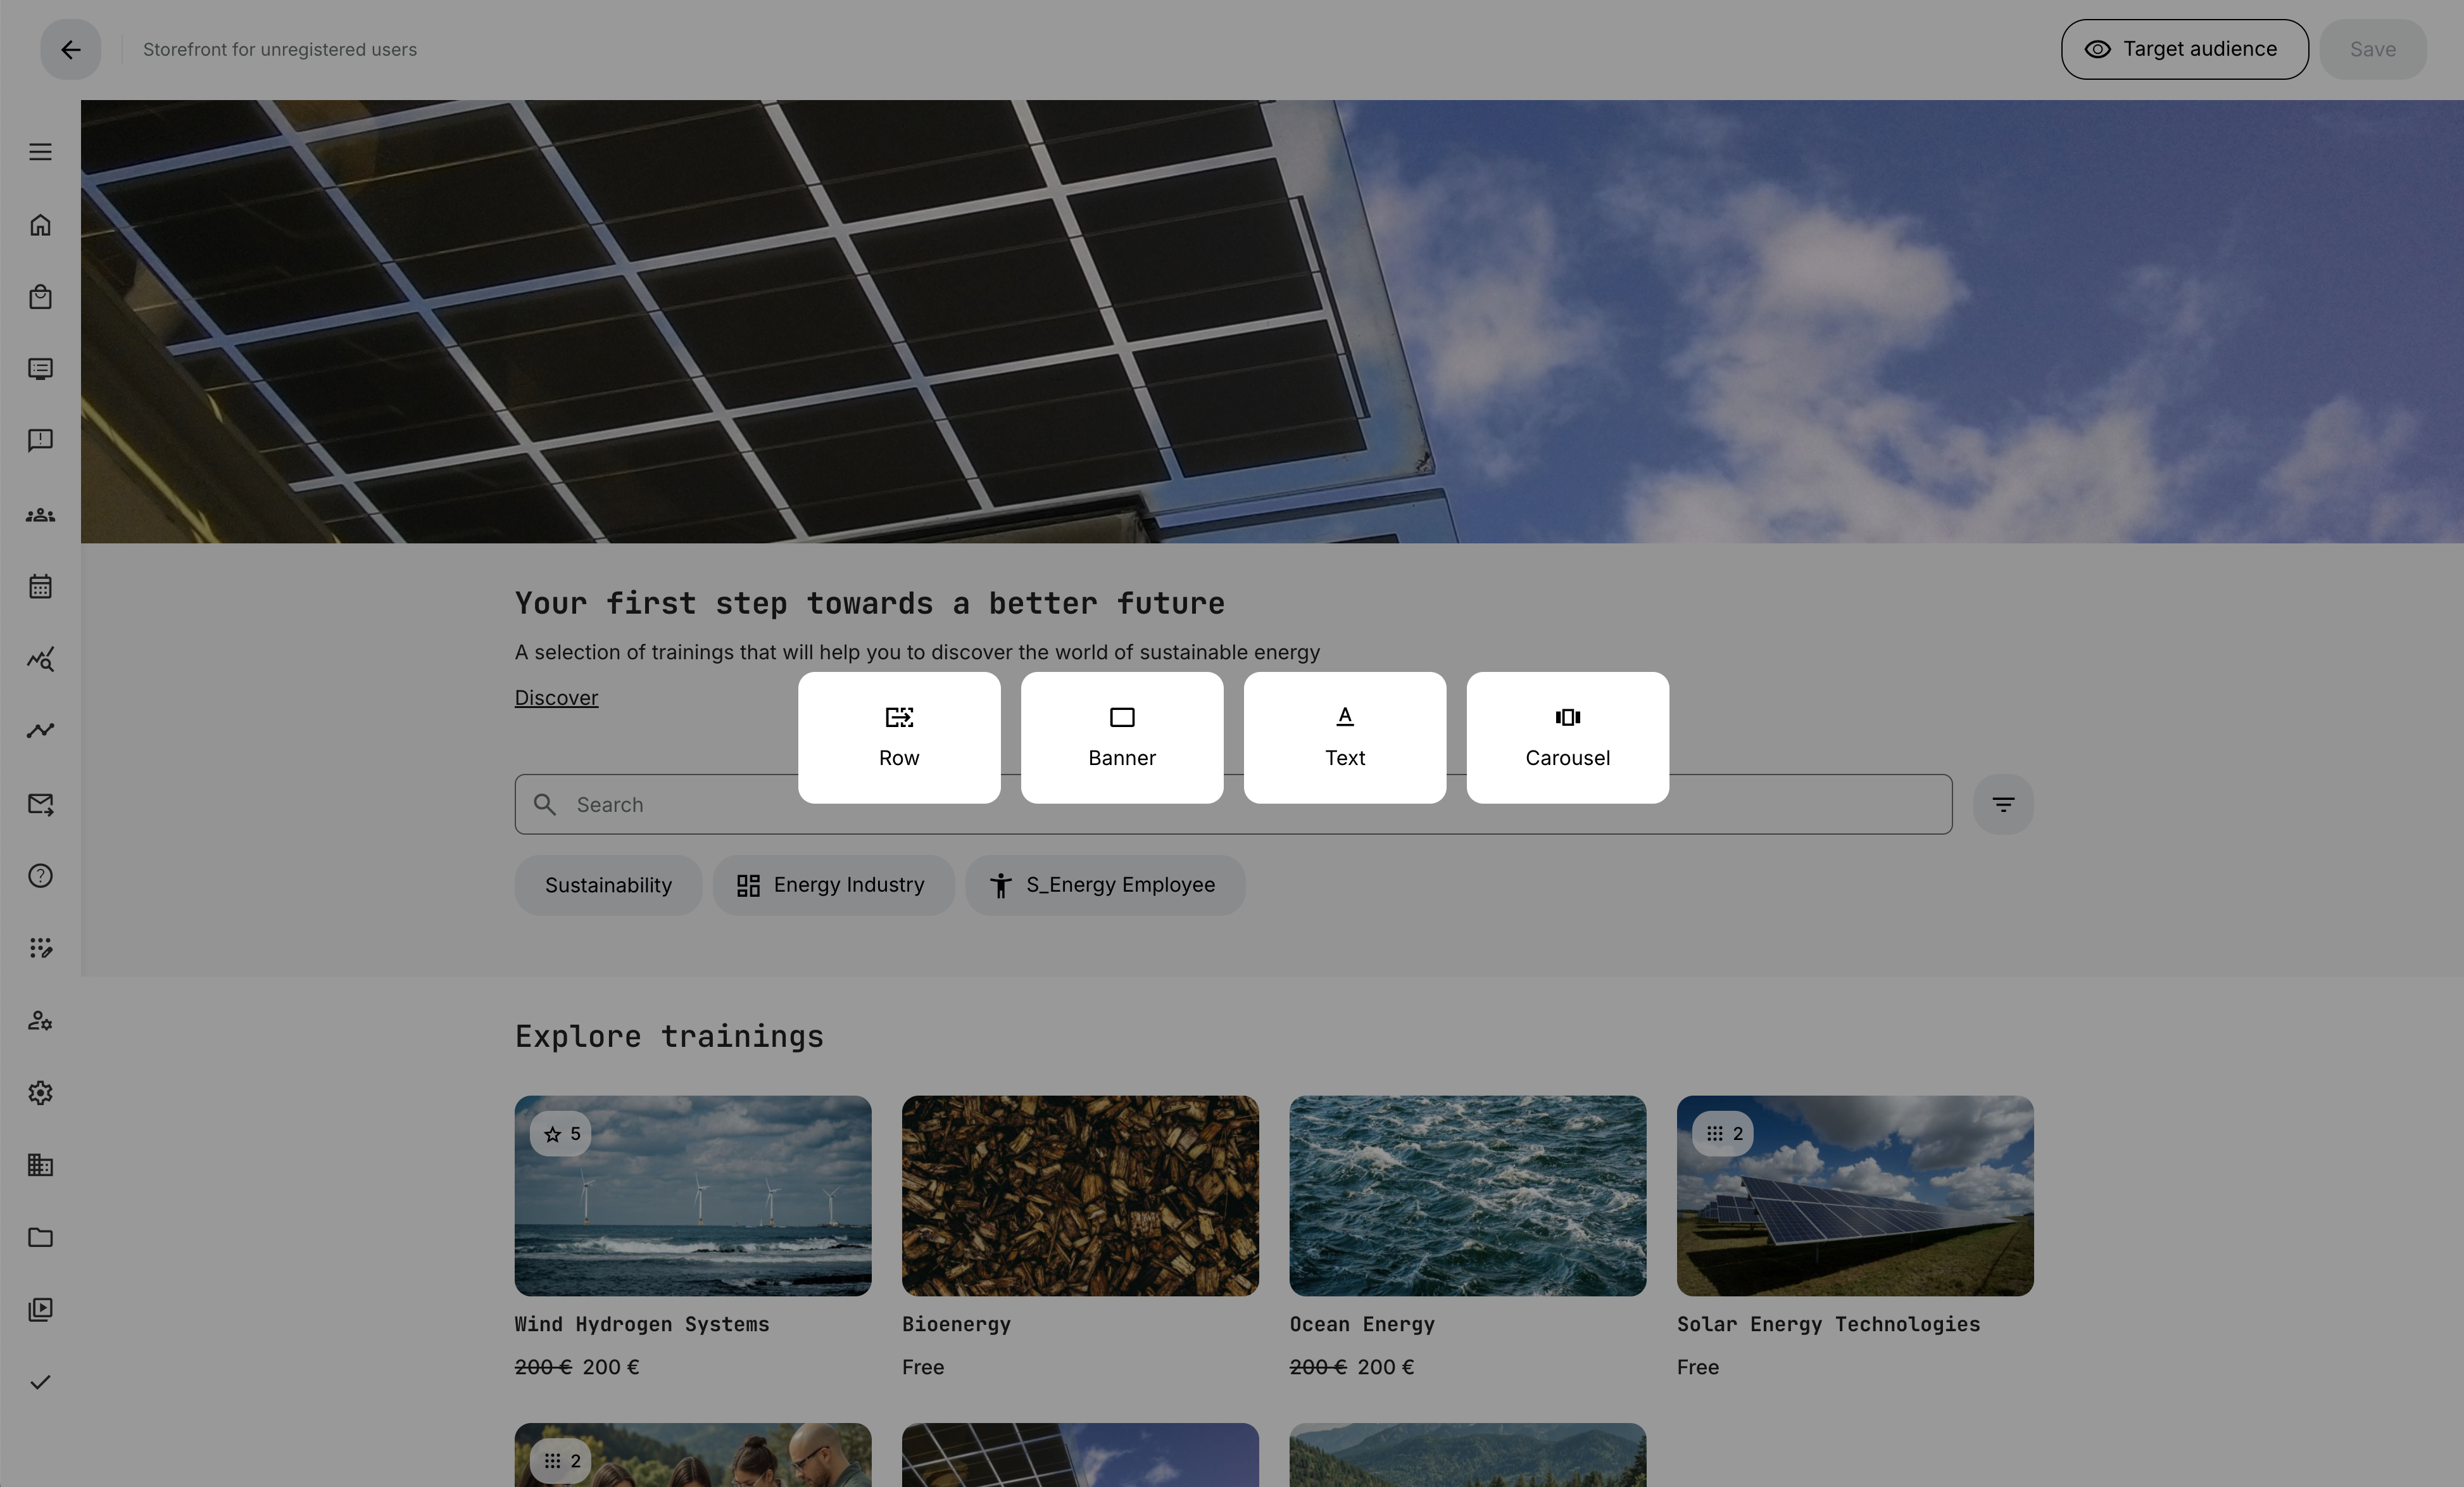
While editing the storefront, you can add new sections like rows, banners, text blocks, or carousels, giving you complete control over the structure and layout.
When hovering over a section, you can:
- Edit or reorder content
- Customize appearance (colors, spacing)
- Clone or remove the section
- Most importantly: Define a Target Audience - ensuring that the section is only visible to users who match the selected profile criteria
This audience filtering feature unlocks true personalization, enabling users to access different Storefront layouts tailored to their specific interests and preferences.
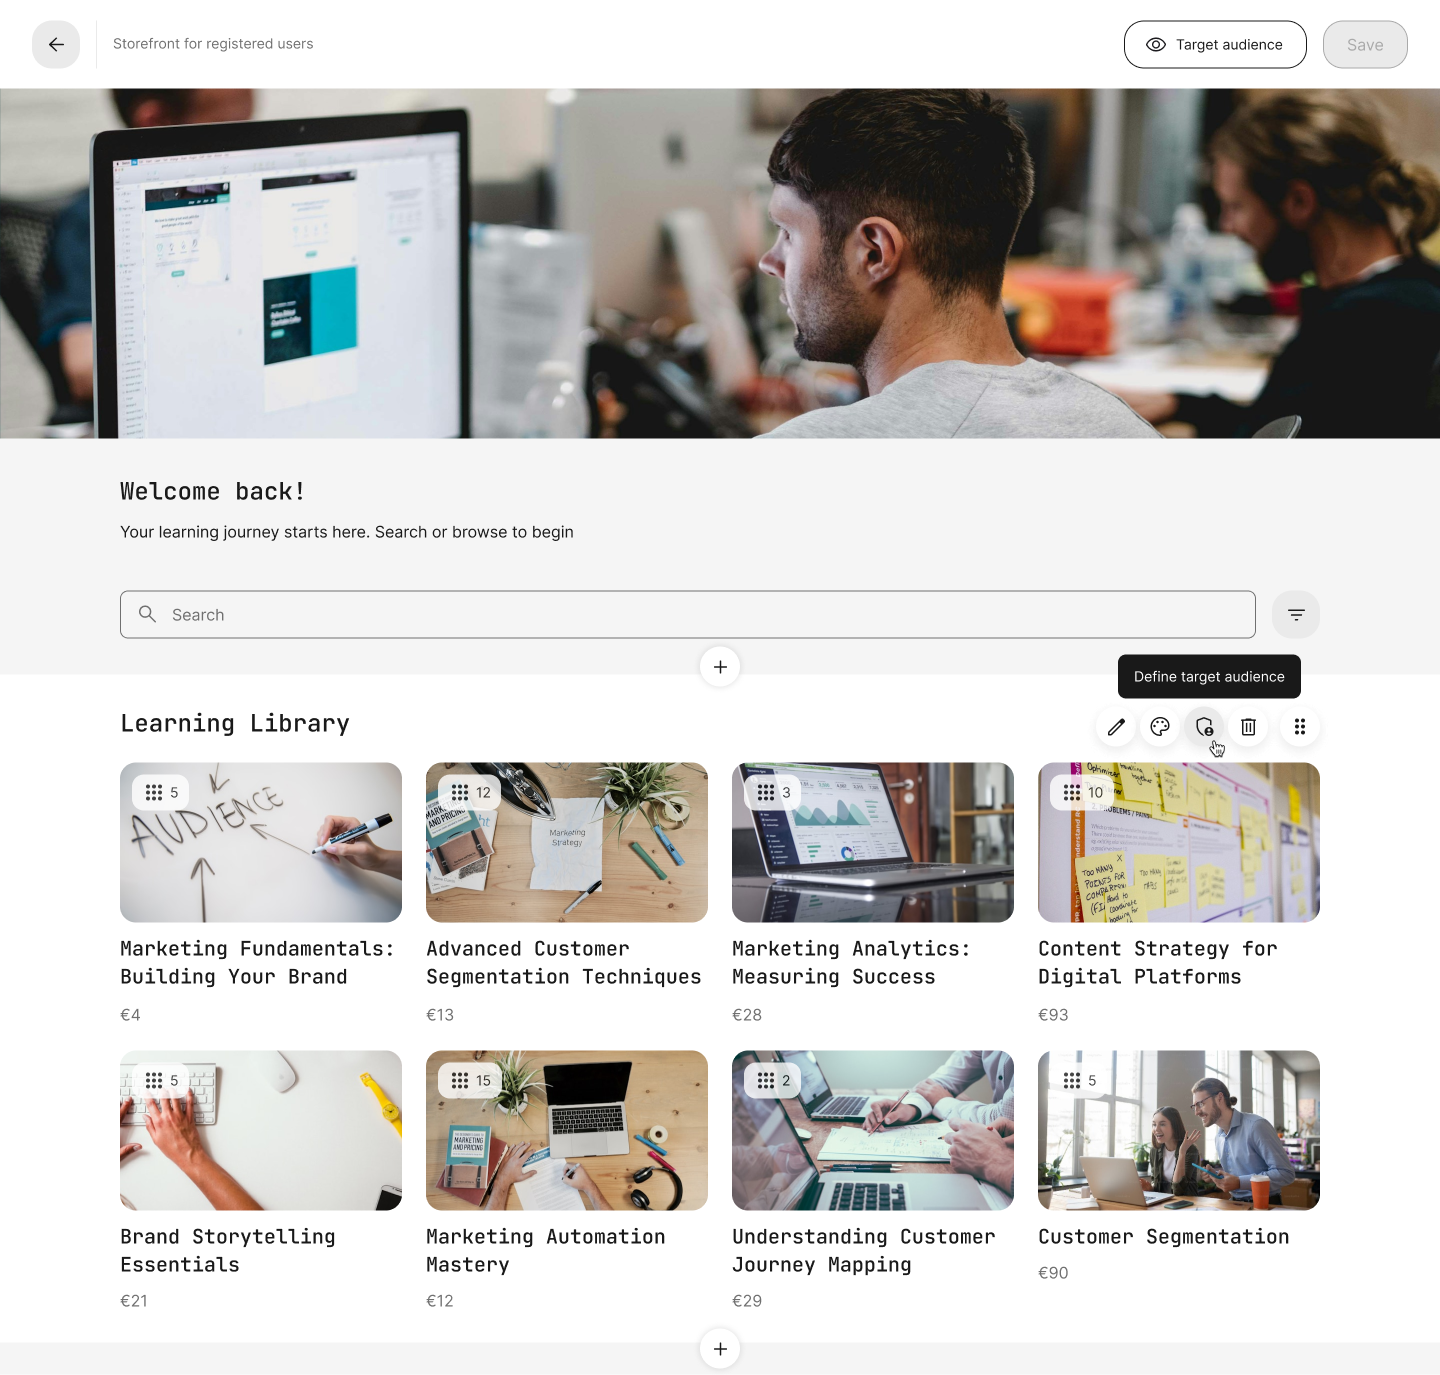
Hovering over a section reveals options to edit, restyle, or define a target audience, enabling precise personalization of various user groups.
Rows - The Centerpiece of the Storefront
Rows are where your Training Activities are showcased, organized into thematic or strategic categories (like "Free Marketing Resources”, “Compliance Training”, or “Upcoming Webinars”).
When creating a row, you can configure:
- Title: This becomes the header of the row
- Training Activities to be included:
- All (all trainings with self-enrollment)
- Free (only free trainings)
- Custom (hand-picked trainings)
- Vocabulary (based on tags like category, type, country, or job function)
- Sorting: Based on upcoming, latest added, highest rated, or alphabetically
- Row Size: 4, 8, 12, or 16 visible items
If more training sessions are available, a “Show more” button will open a dedicated page displaying the complete list.
Like all other sections, rows can also be targeted to specific audiences, ensuring that your users see the most relevant information.

When creating a row, you can define its title, select the trainings to include, set sorting logic, and specify the number of items to display. Additionally, you can support targeted audience visibility.
Target Audience Preview
To simplify the management of complex storefronts, you can now preview the storefront from the perspective of a specific audience. Located at the top right of the storefront settings page, the Target Audience button enables you to simulate the storefront as it appears to users matching a selected audience (determined by tags such as organization, job role, country, and so on).
- Even better, once an audience is selected in preview mode, any new sections added will automatically inherit the same targeting, saving time and ensuring consistency.
- This feature is essential for anyone building storefronts that cater to multiple audiences, campaigns, and organizational segments.
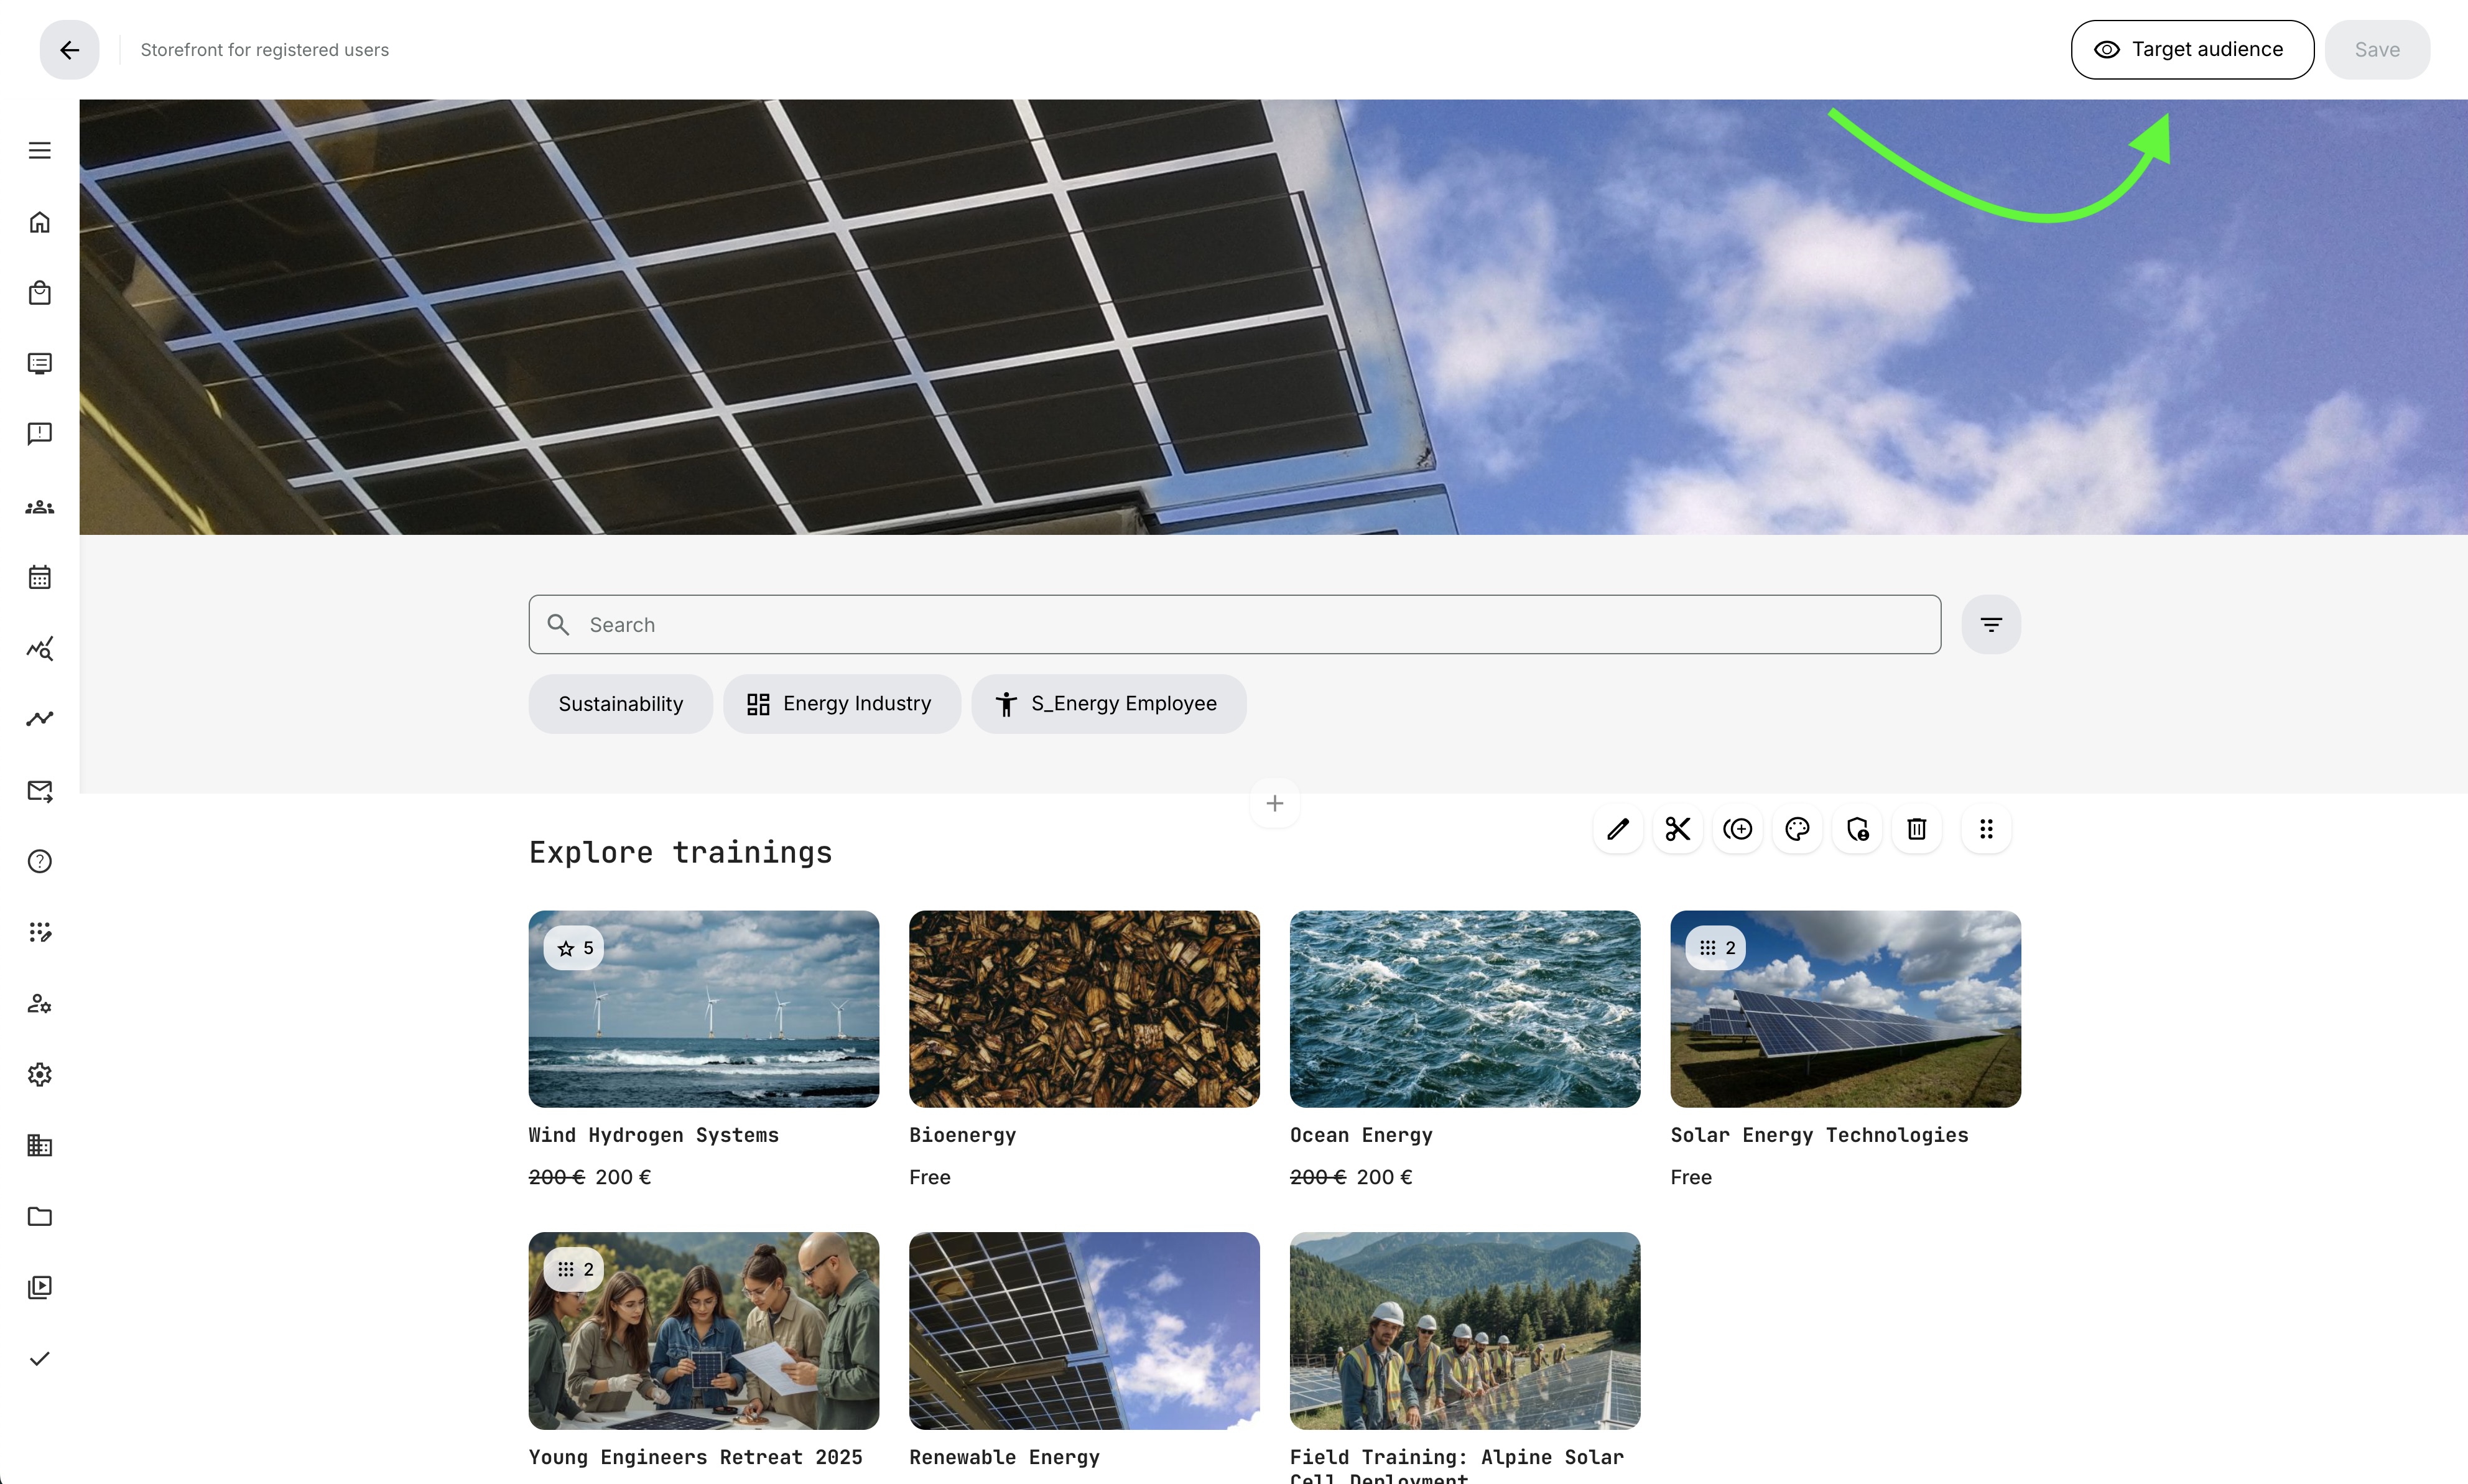
Use the Target Audience button to preview the storefront from a specific audience’s perspective, automatically applying that audience to new content sections.
What Happens When Your Platform is Updated?
When your platform is updated to this version:
- Your existing catalog will be automatically migrated into the new Storefront structure.
- Learners won’t experience any disruptions as they’ll still have access to the same training activities.
- The catalog will no longer be visible on the dashboard. Instead, a new Storefront menu item will guide users to the redesigned course discovery page.
- The “Explore Trainings” button on the dashboard will now directly link to the Storefront. Additionally, a “new” indicator will highlight the Storefront for all users logging in for the first time.
From there, you can start enhancing the Storefront using all the new layout and targeting tools.
Introducing Subscriptions - Recurring Access to Premium Training
Subscriptions on the Eurekos platform offer a new level of flexibility, enabling you to provide curated training bundles through recurring payment plans.
Subscriptions offer a flexible pricing model that aligns with your training strategy, whether you’re building a member-based academy, offering exclusive bundles, or aiming to foster long-term engagement through recurring access.
Subscriptions are managed under Course Administration > Subscriptions and seamlessly integrate with the new Storefront, enabling their display, promotion, and purchase.
Why use Subscriptions?
Subscriptions are more than a pricing tool - they support a range of strategic goals:
- Fund continuous content development: Generate recurring revenue to fund ongoing content updates, new features, certifications, and premium offerings.
- Drive engagement: Encourage repeat visits and sustained platform activity by offering ongoing access to evolving training programs
- Improve customer retention: Reduce user friction by allowing them to subscribe once and access a broader learning journey, improving customer retention.
- Offer flexible pricing models: Let users choose between monthly or annual billing. Discounts for annual plans are highlighted to help drive conversions.
Subscriptions can be featured directly in the storefront using carousels, giving learners clear access to curated bundles and recurring training offers.
Creating and Managing Subscriptions
To begin, navigate to Course Administration > Subscriptions. From here, you can view, search, and manage existing subscriptions or create a new one. When creating a subscription, you have the option to:
- Add a title and optional short description
- Upload visuals:
- Banner image (4:3 for the checkout page)
- Carousel banner (16:9 for storefront promotion)
- Select included training activities:
- All self-enrollable trainings on your platform
- Specific trainings, with the option to auto-enroll subscribers upon purchase
- In either case, subscribers gain free access to the included content once subscribed
- Set pricing and billing frequency
- Monthly and/or annual
- Choose payment method:
- Stripe is supported in this release with more payment gateways to come. Set up your Stripe account under Settings > Third Party Integrations > Stripe, then select it during subscription setup.
Once created, you’ll land on the subscription management page, where you can:
- View and manage the included content
- Monitor subscribers and their payment status
- Cancel individual subscriptions
- Edit the subscription description page - a customizable landing page using the native authoring tool, complete with embedded pricing and purchase options
You can also deactivate a subscription entirely. This ensures that current subscribers continue to have access until the end of their billing period, after which all access and data will be removed.
The Course Administration panel provides a comprehensive interface for creating and configuring subscriptions. Users can set visuals, included content, billing options, and payment methods for each subscription. Quarterly subscription plans are expected to be introduced on the roadmap in the future.
Featuring Subscriptions in the Storefront
Once a subscription is created, you can promote it in the Storefront using the Carousel widget. Each slide can showcase either a subscription or a Training Activity. Additionally, you can target specific audiences for carousel sections, just like you can with any other storefront section, by utilizing the Define Target Audience option.
When a user clicks on a subscription, they are redirected to the subscription description page, where they can explore the offer, choose their preferred billing plan, and proceed to the checkout process.
While the storefront serves as the primary method for showcasing subscriptions, it’s not an absolute necessity. You can still create subscriptions and share direct links to their description pages, even if the storefront is disabled.
Shareability and Social Features
Encourage organic growth and referrals with built-in sharing options. From the subscription description page (and after purchase), users can:
- Recommend the subscription by email to friends or colleagues
- Copy a direct link to share the subscription elsewhere
These same options appear on the checkout and order confirmation page, making it easy to promote your offering through organic referrals.
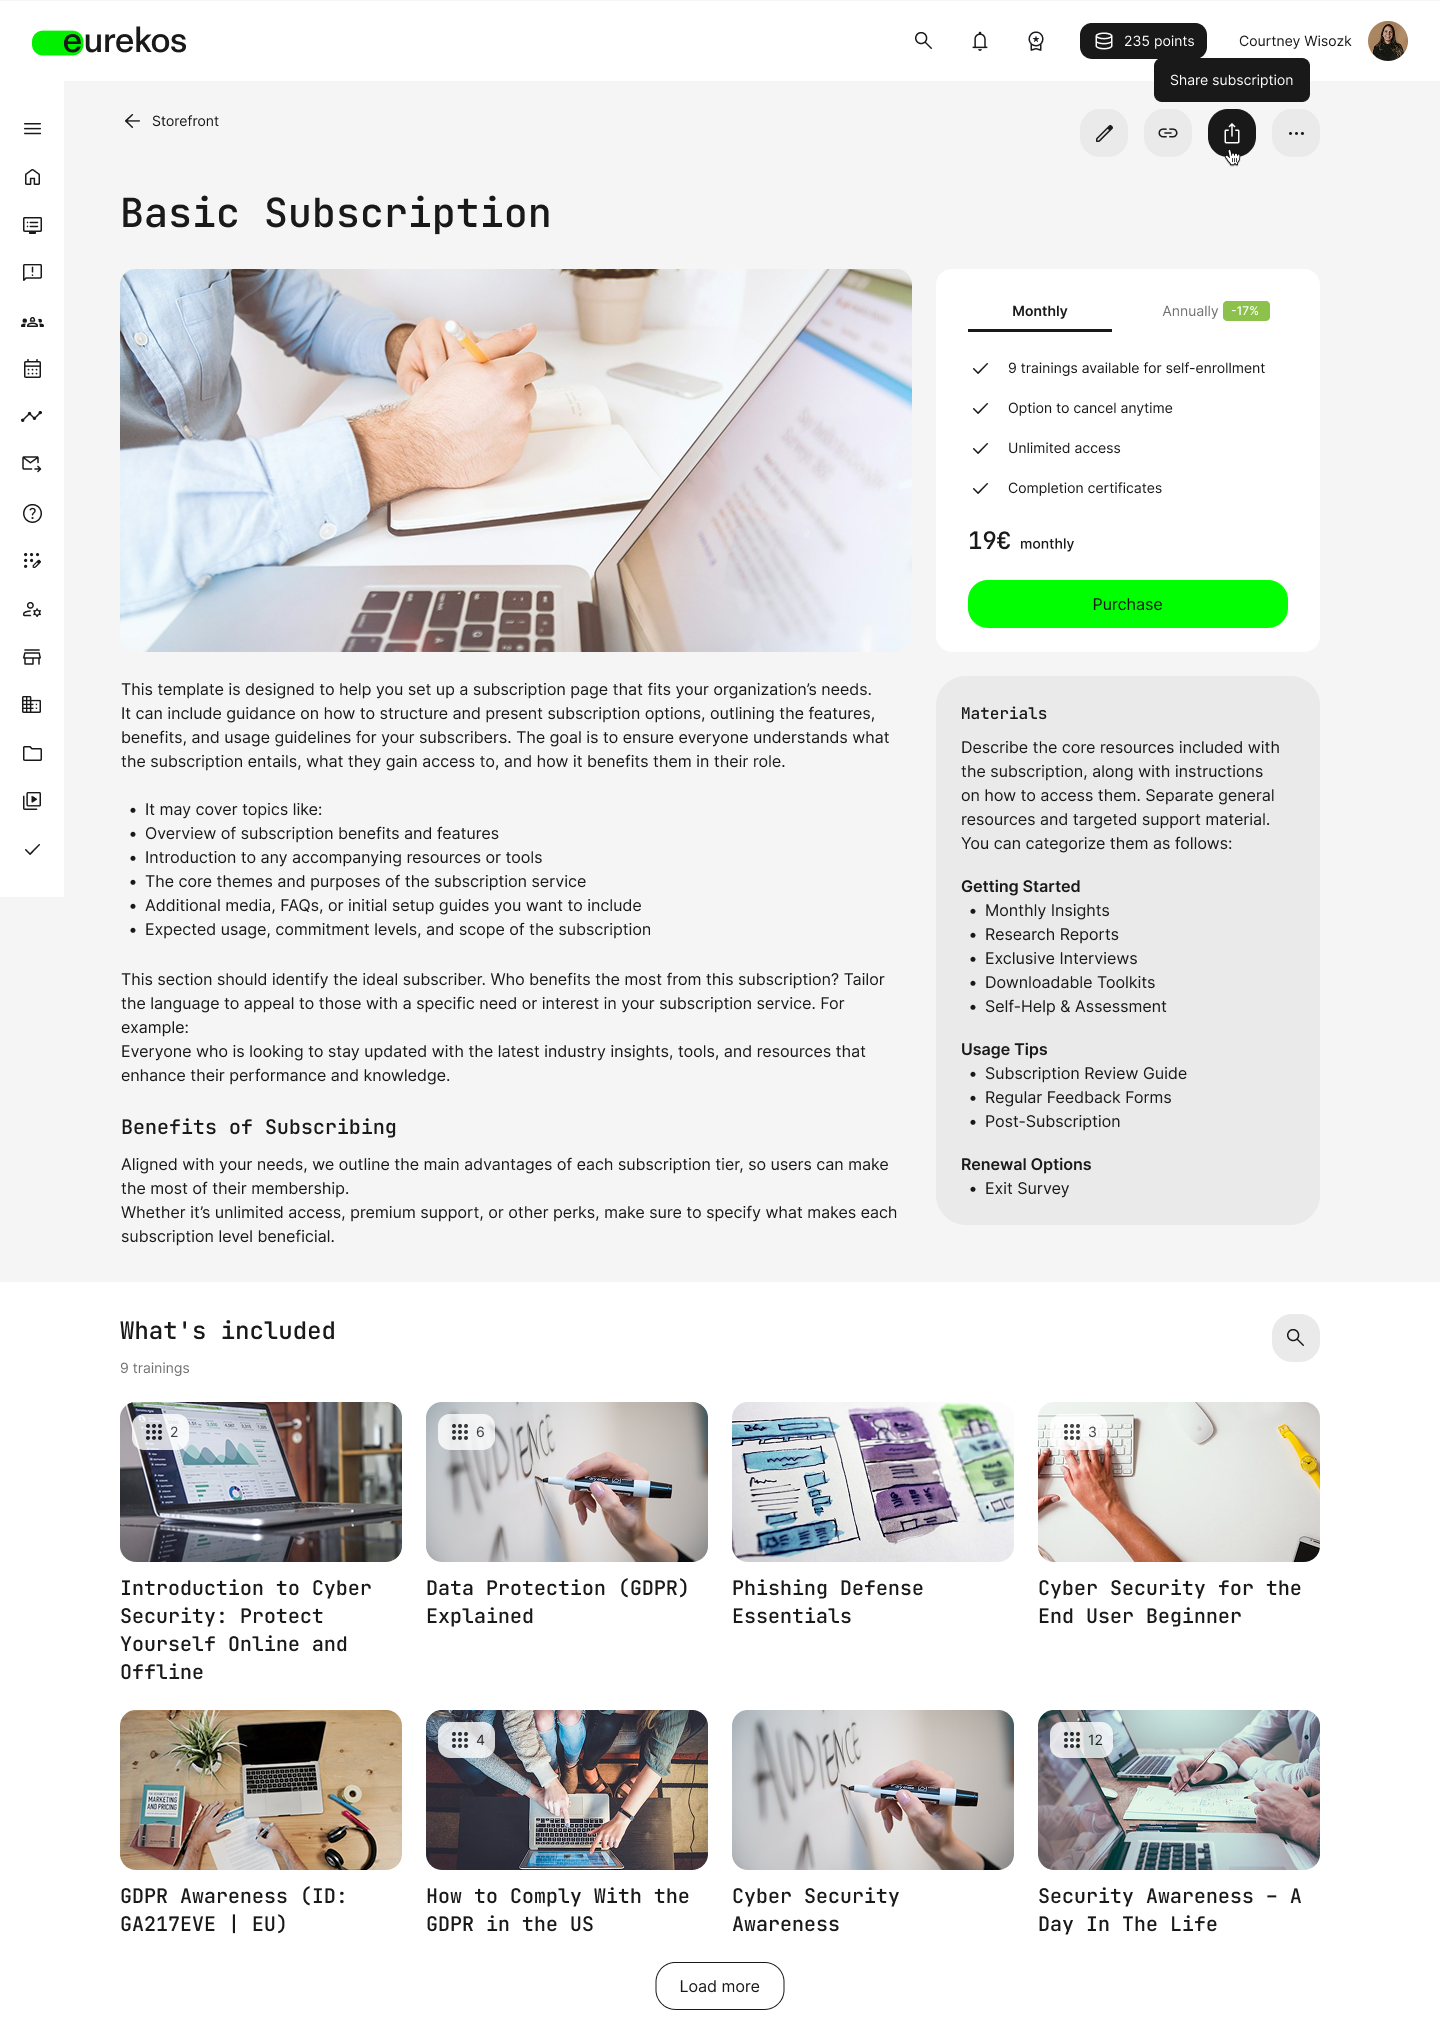
From the subscription description page, users can share the subscription via email or copy a direct link.
Managing Subscriptions as a User
Subscribed users can manage their subscriptions from their profile > Subscriptions section. Here they can:
- See which subscription(s) they have
- View their billing cycle and next payment date
- Explore what’s included in the subscription
- Access payment history and invoices
- Cancel or reactivate their subscription
Cancelling a subscription immediately prevents future renewals. Users retain access until the end of their current billing period and can reactivate their subscription anytime before that.
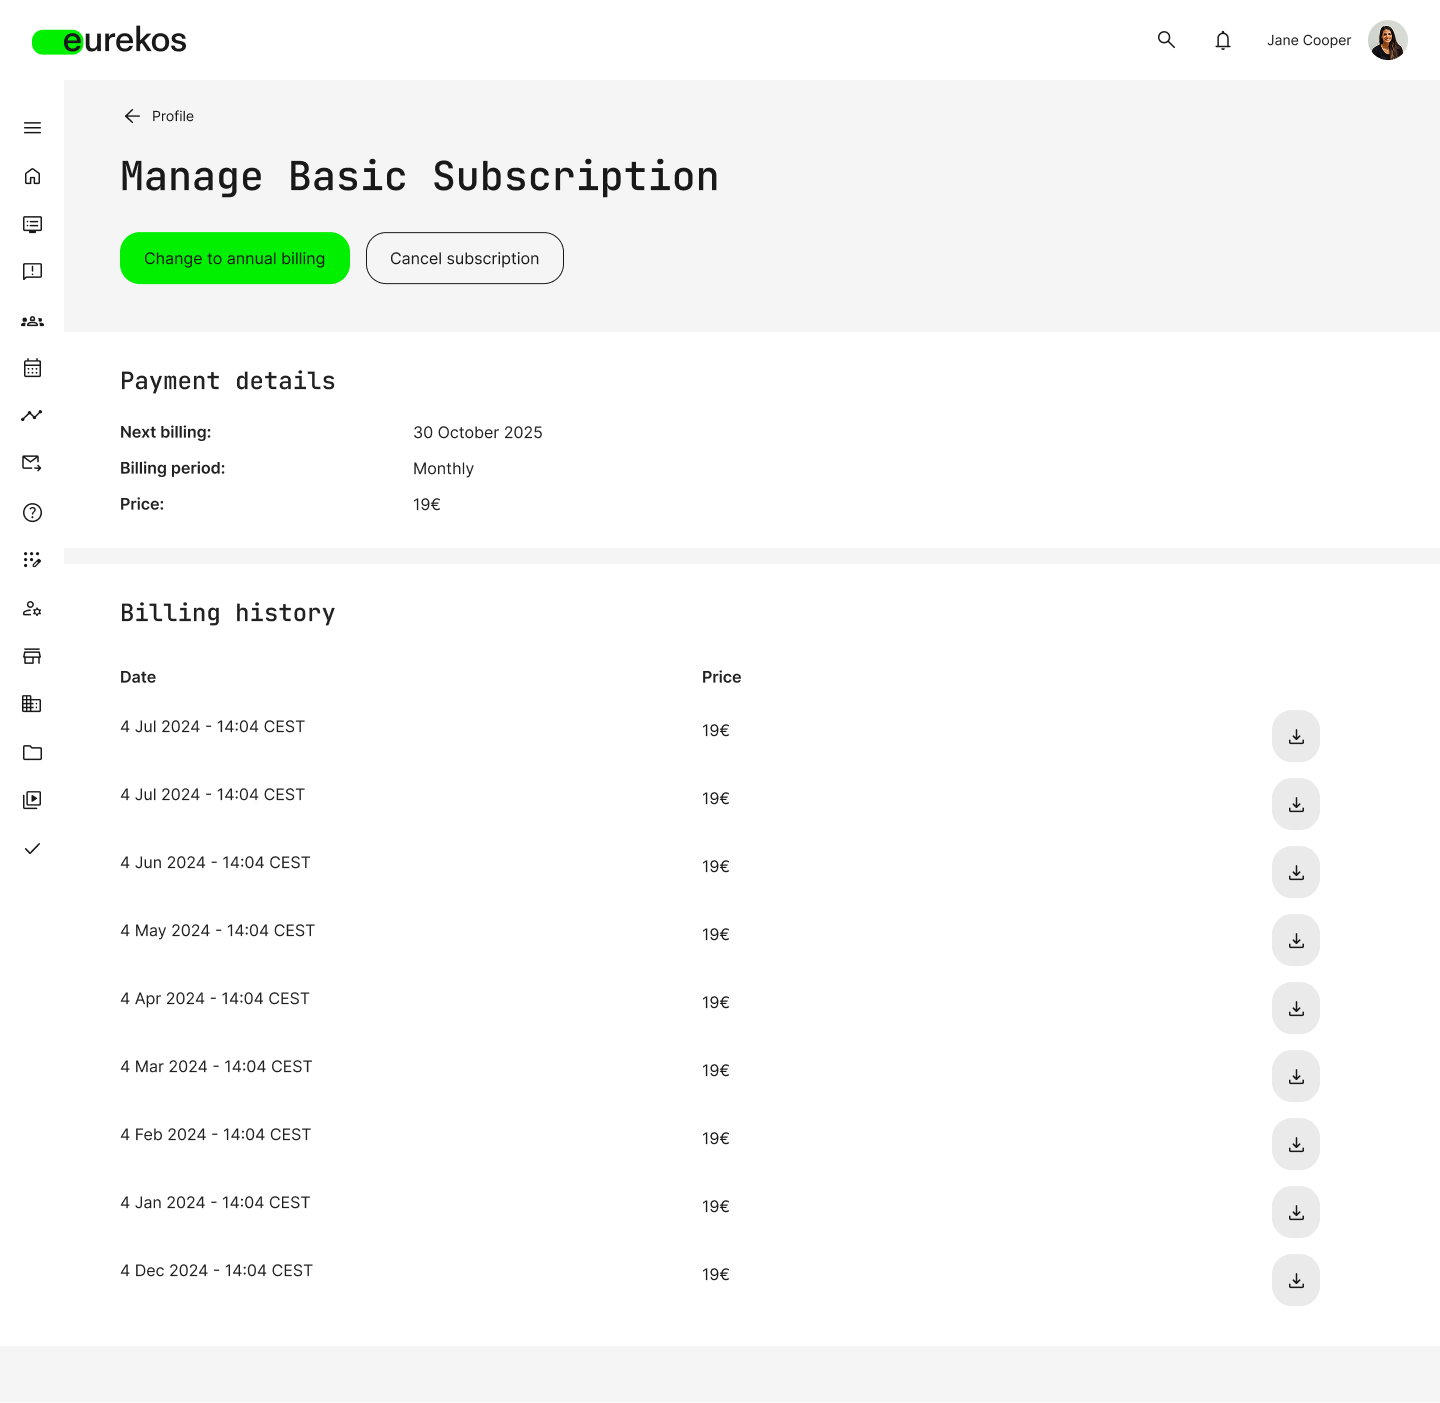
Subscribed users can manage their billing preferences, view their payment history, and cancel or reactivate their subscription from their profile.
System Emails for Subscriptions
To support the full lifecycle of a subscription, a new set of system emails is available under Settings > Email Sending > System Emails > Subscriptions, including:
- Thank you for subscribing
- Successful payment
- Failed payment
- Subscription cancelled
- Upcoming price changes
- Changes to subscription content
- Shared subscription invitation
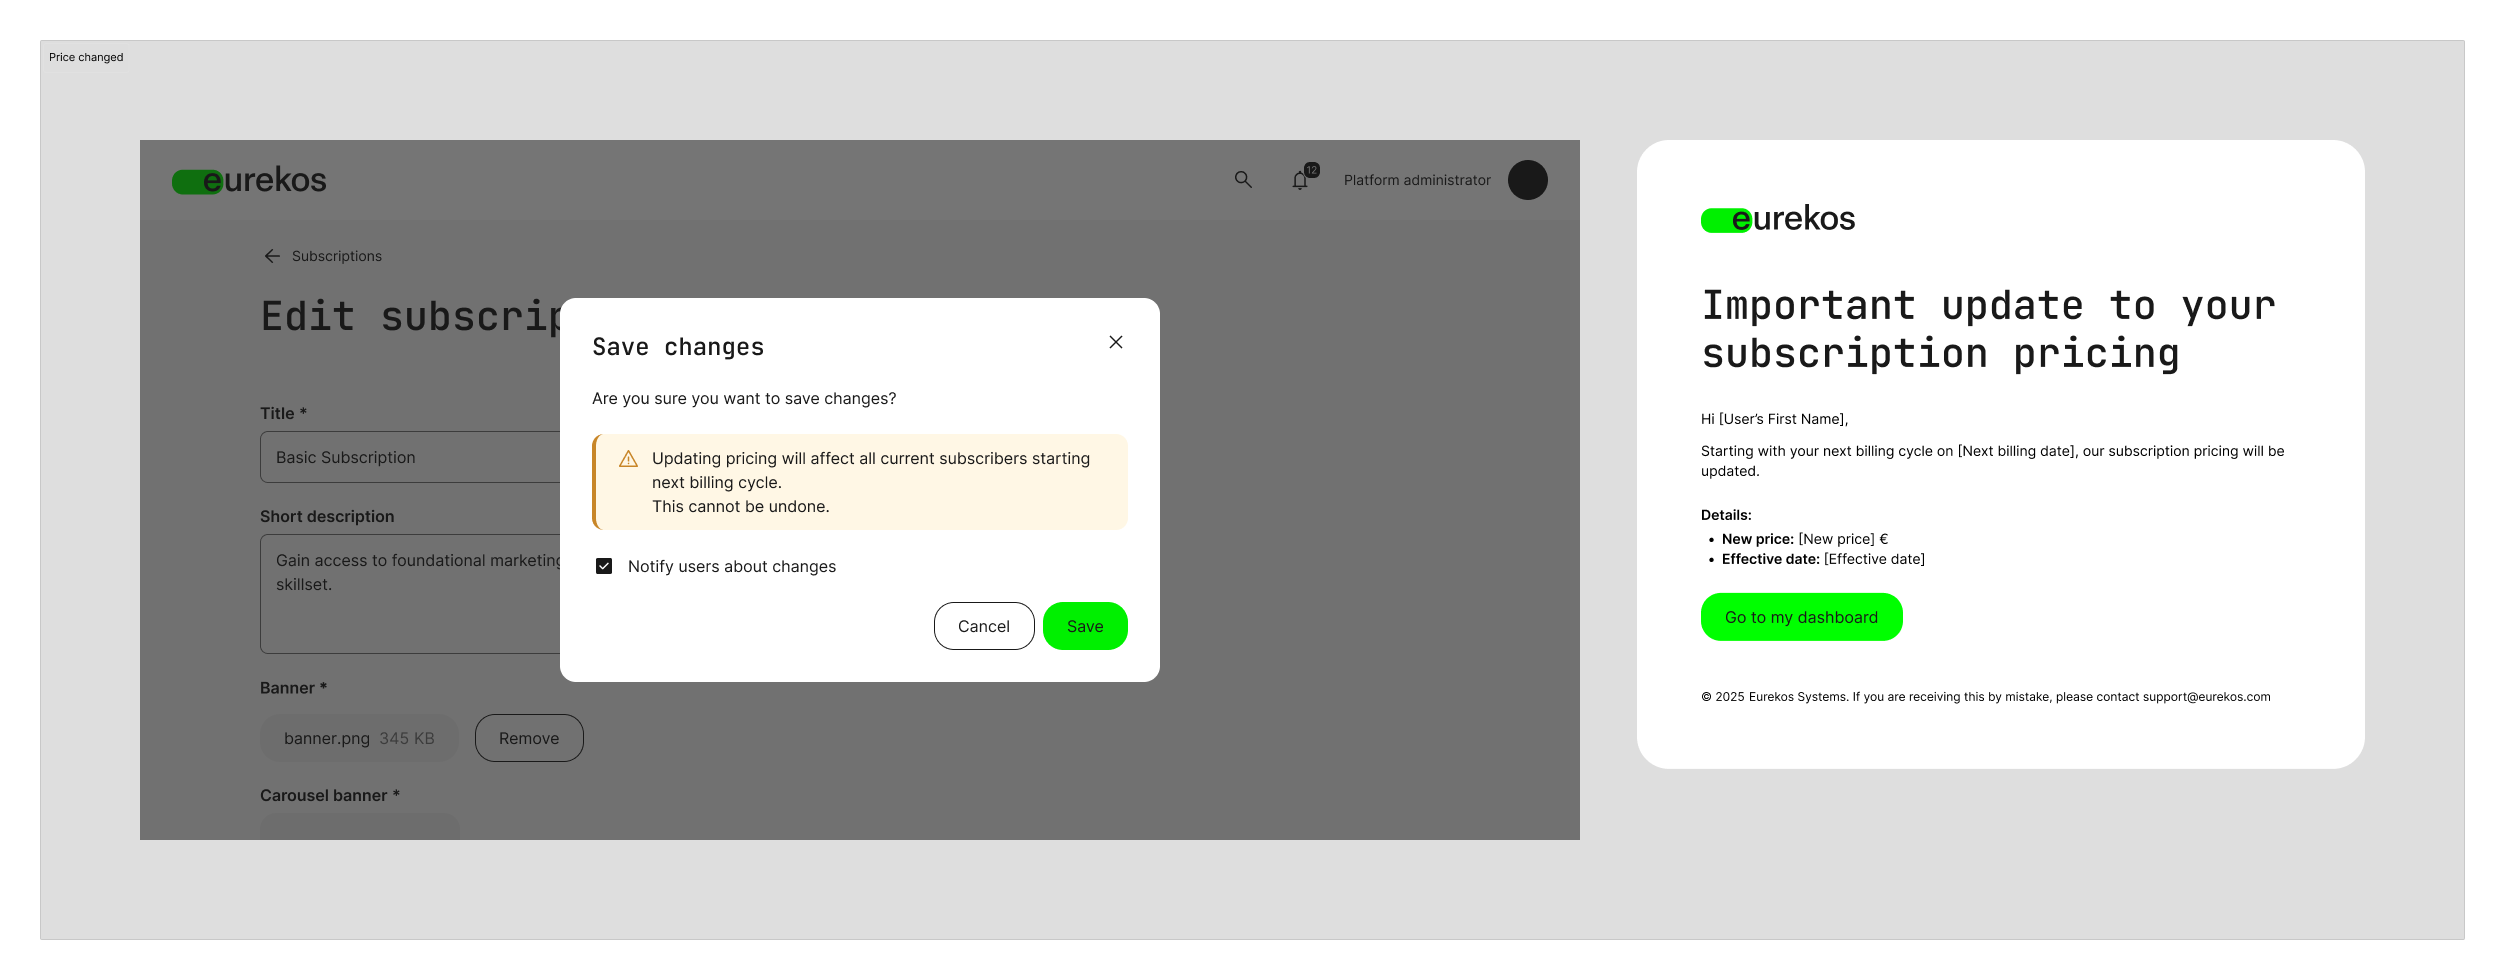
A new suite of system emails supports the entire subscription lifecycle, encompassing confirmations, payment updates, cancellations, content modifications, and pricing notifications.
Meta-level Analytics with Visual Dashboards
This release marks a significant advancement in platform-wide insight. We’ve introduced a new structural approach and powerful Visual Dashboards that enable you and your stakeholders to access meaningful data more quickly. These dashboards transform static reports into actionable intelligence, providing deeper insights across your learning ecosystem. They offer business intelligence-level insights out of the box, with filters and visuals tailored to the metrics that matter most to your organization.
The new dashboards, whether you’re training customers, partners, or internal teams, help you measure engagement, track adoption, monitor completion, and continuously improve your learning offerings.
What's changed?
- Reports → Analytics: The "Reports" section has been renamed Analytics. It's the new home for insights, now with dynamic, visual dashboards.
- New Visual Dashboards: Seven analytics types now feature fully redesigned dashboards (see descriptions below). For all other analytics types, you will be taken directly to the familiar report download page.
- Statistics → My Progress: The "Statistics" menu item is now called My Progress and only shows your own learning data, regardless of role. If you're an instructor or admin and previously used this view to track learner progress, you'll now find that functionality under Analytics > Progress.
- Training Statistics → Progress: The analytics type formerly known as Training Statistics has been renamed Progress.
- Updated Manager Dashboard: Managers now see a redesigned overview on their homepage, detailing their training and certification statuses. From there, they can click through to the full Learning Performance dashboard for complete insights.
- Updated Admin Dashboard: Platform administrators now see two new widgets on their homepage:
- Activities Overview: Displays the total number of activities on the platform, the number of Training Activities available for self-enrollment, and a chart breakdown by type.
- Analytics Preview: Quick-glance metrics for select dashboards with direct links to dive in.
Analytics Permissions
We’re also introducing permission management for analytics. Now, you have complete control over who can access which reports and dashboards. This allows you to delegate insights and eliminate the manual process of extracting and distributing reports to others. To begin managing permissions, navigate to Settings > Analytics Permissions.
- Grant role-based access to specific analytics types (e.g. Active Users, Certificates, Progress)
- All data is automatically prefiltered according to the user's role and organization.
During the upgrade, permissions from the previous release are preserved. While there’s no immediate need for reconfiguration, we encourage platform admins to review the new options to unlock even greater value for local roles.
Explore the new Visual Dashboards
In this initial phase, seven analytical types now feature fully visual dashboards. Each dashboard presents data in a clear and interactive format, complete with filters, charts, and breakdowns that empower users to take action based on the data. A detailed description of each new dashboard is provided in the subsequent section.
- Active Users
- Questionnaires
- Content Engagement
- Ratings
- Certificates
- Time & Engagement
- Learning Performance
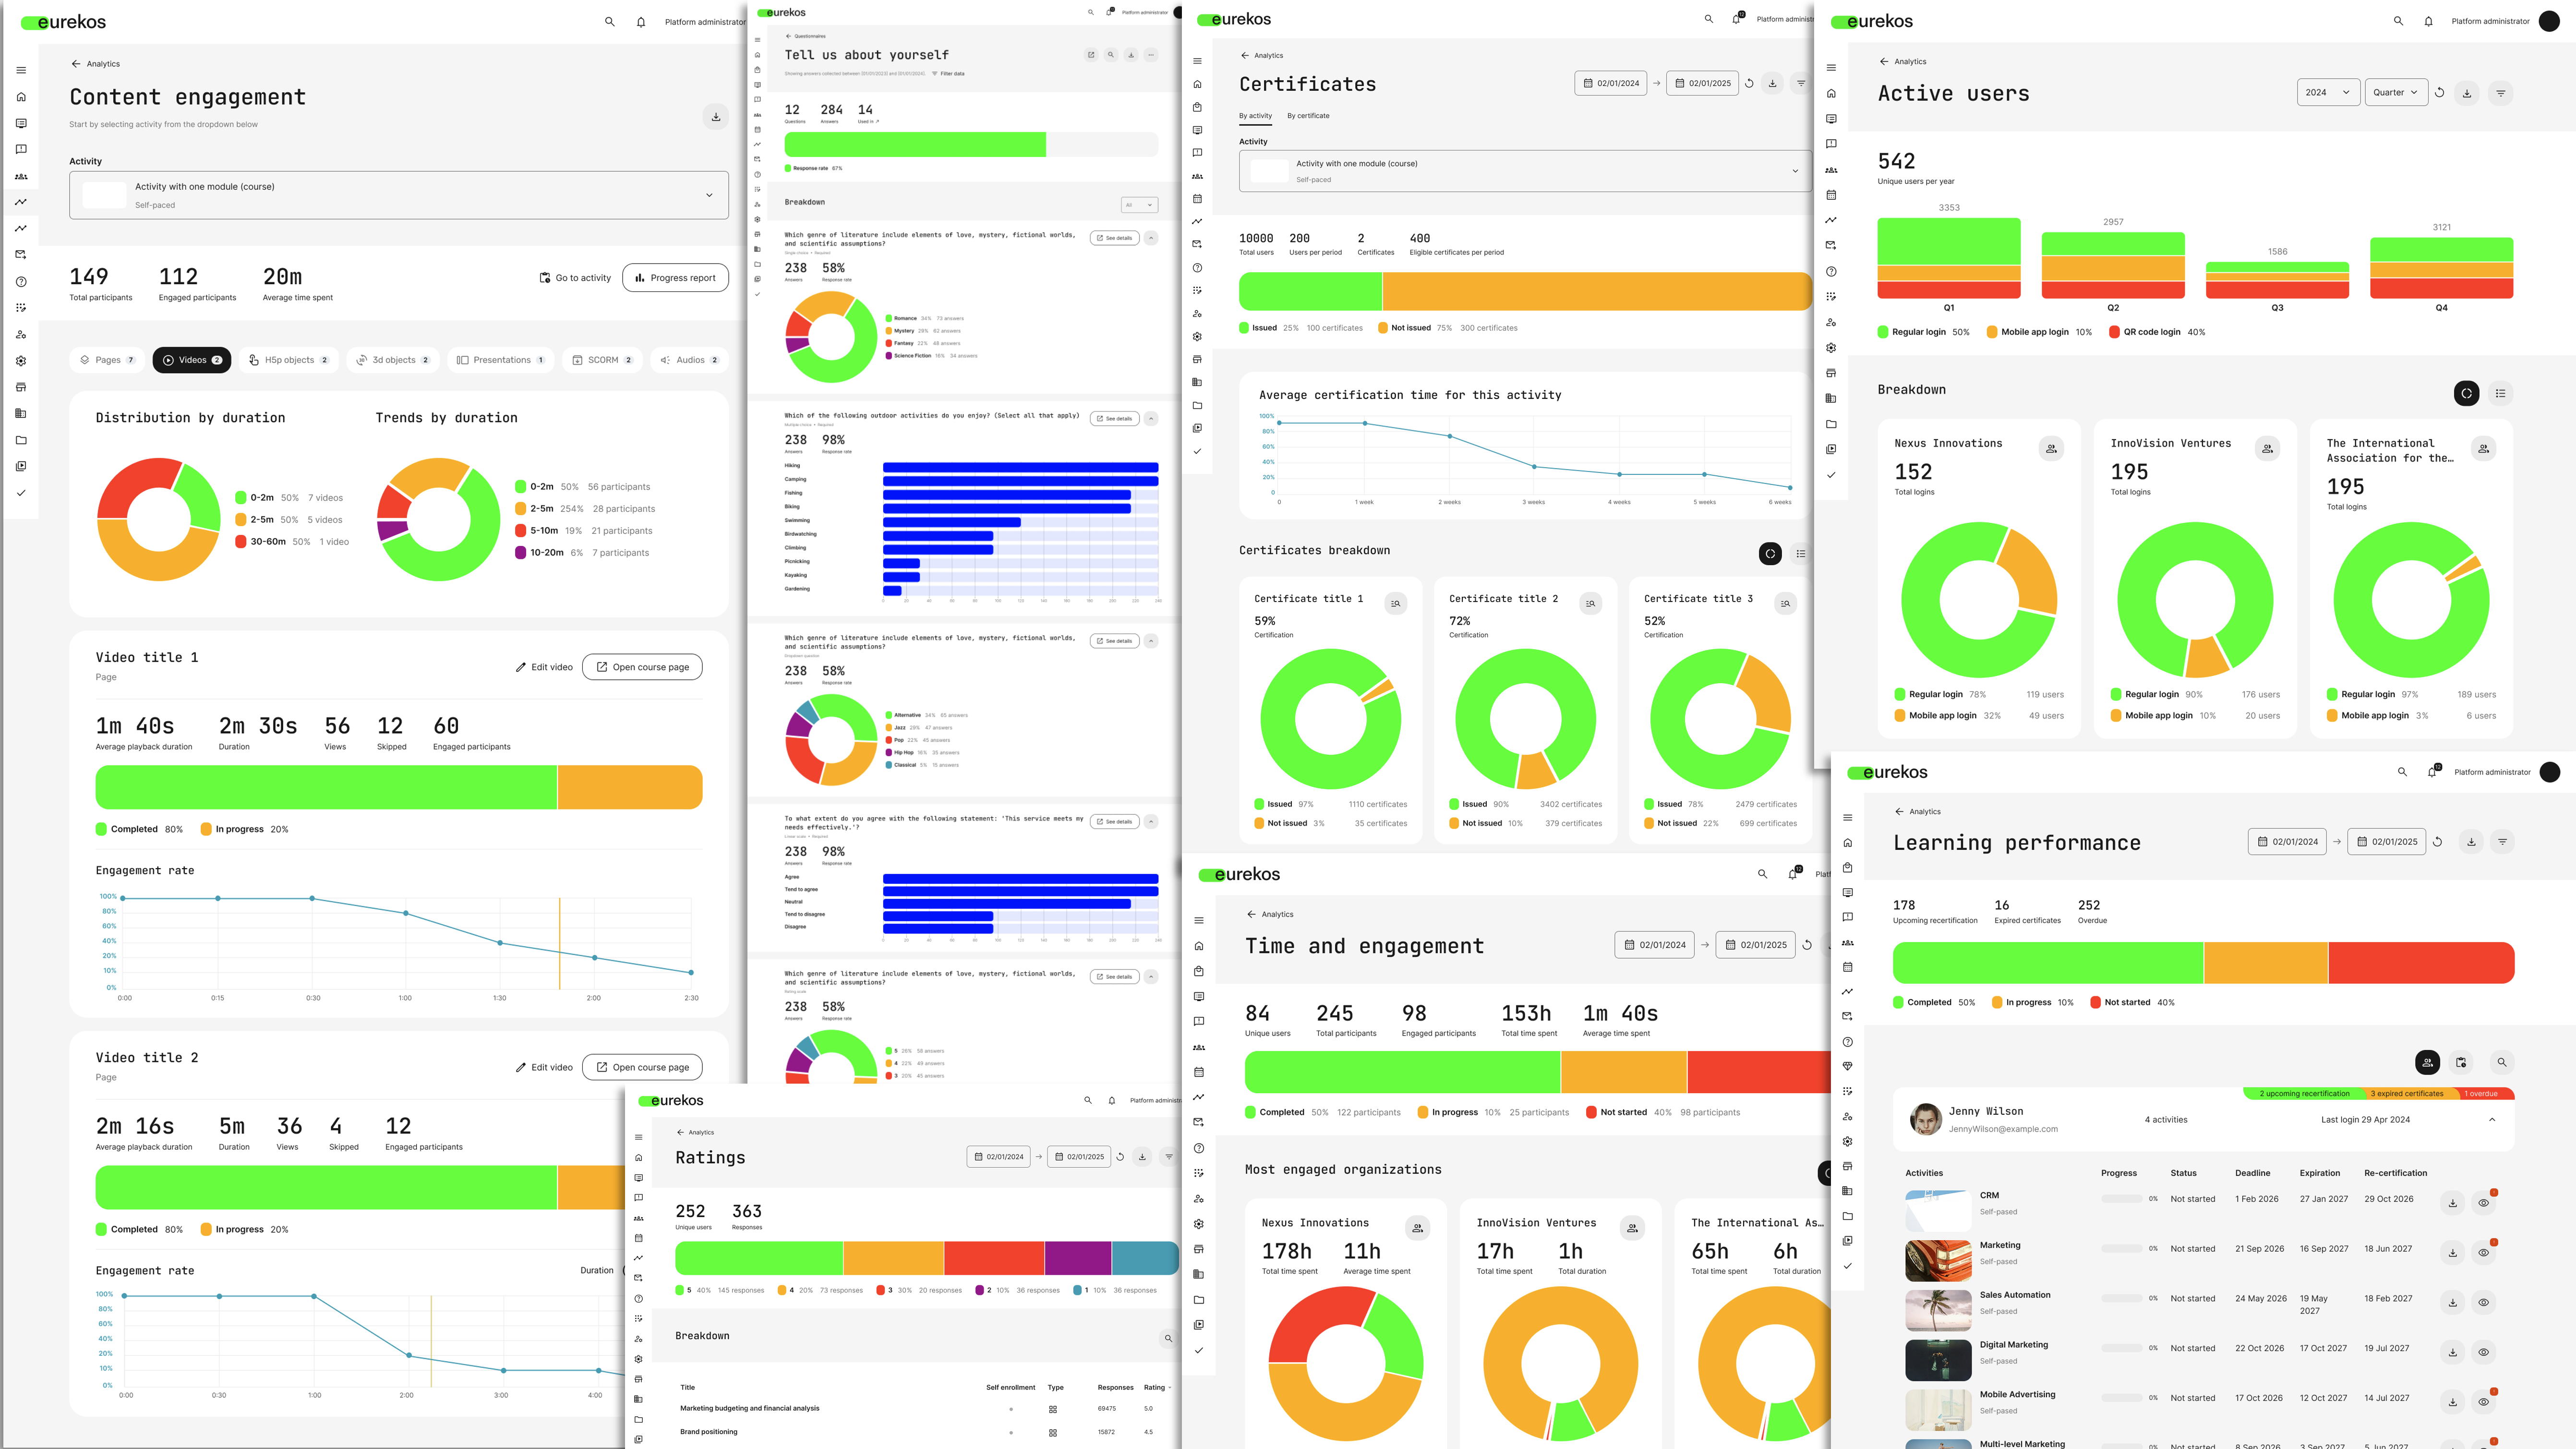
Seven new visual analytics dashboards: Active Users, Questionnaires, Content Engagement, Ratings, Certificates, Time & Engagement, and Learning Performance
Active Users
Track platform activity across various audiences and login methods. Filter the data by organization, country, tag, or access method (QR code, app, desktop) to identify areas of strong engagement and those that require improvement.
- Quarterly and monthly login trend visualization
- Breakdown by organization (including users without an org)
- Filter by login type, country, organization, and job function
Questionnaires
Analyze submissions and response rates across all questionnaires on the platform to provide a comprehensive overview of your questionnaires’ performance, from onboarding forms to course evaluations and surveys.
- See how a questionnaire is used (activities, email rules, enrollment forms, etc.)
- Drill down into each question for distribution, response breakdown, and per-user insight
- Link directly to review or download full reports
Content Engagement
Analyze learner interaction with Eurekos-native content to optimize the learning flow, identify drop-offs, and pinpoint high-performing assets. This dashboard is particularly useful for content creators and course designers seeking to enhance the learning experience.
- Analyze engagement with course pages, videos, H5P objects, and more
- View average time on page, video drop-off points, scores, attempts, and ratings
- Direct links let you jump into editing or previewing content directly from the dashboard
Ratings
Identify the training activities that resonate with your learners and pinpoint areas for improvement. This dashboard provides a quick overview of learner satisfaction, enabling you to refine your training catalog, showcase top-performing content, and address underperforming offerings effectively.
- View response distributions (1–5 stars)
- Filter by training type, time, organization, or tag
- Identify top and low-performing trainings at a glance
Ratings are enabled per Training Activity via the Activity settings
Certificates
Track certification across your platform and monitor learners’ progress toward accreditation. This feature is particularly useful for understanding performance across teams, geographies, or product lines.
- Certificate issuance rates and average time to certification
- "Used in" view showing where certificates are applied
- Breakdown by activity and organization
Time and Engagement
Gain a comprehensive view of user engagement, with the option to zoom in on specific details. This allows you to understand how much time learners spend on your platform and how engaged they are across different training experiences. You can also compare performance by audience, region, content type, or organization.
- Engagement metrics: Unique users, engaged participants, total and average time spent
- Completion status breakdown: completed, in progress, not started
- Comparing organizations to identify where engagement is strongest.
Learning Performance
Previously accessible only to managers, this dashboard now offers a comprehensive view of user progress, recertification timelines, certificate expirations, and overdue training sessions.
- Completion and certification status (incl. expired and upcoming)
- Toggle between user- or training-based view
- Visual progress breakdowns with filters for organization, role, job function, and more
The remaining reports can still be accessed as usual from the new Analytics section in the main menu. These updates signify the commencement of a new, data-driven analytics experience in Eurekos, empowering you to gauge what truly matters to you and your stakeholders, and fostering continuous improvement in learning outcomes across your audiences.
Skills Management
We’re introducing Skills Management in Eurekos, a new framework that enables you to assign, track, and report on competencies across your platform. This framework can be linked to certifications or assigned by administrators. Skills can support your upskilling initiatives when verifiable and transferable skills are relevant.
Once enabled, learners can automatically acquire skills by completing certified trainings, and their current skills are displayed directly on their user profile. Additionally, learners can manually assign skills for external training or assessments, and all of this information can be reported from a single centralized location.
How it works
Skills can be enabled from Settings > General > Skills, and you can either choose to use them:
- With levels (enables numeric values following cumulative logic)
- Without levels (Skills added as tags without numeric values)
Once enabled, you'll find a new Skills configuration menu in the platform settings, where you can define custom skills. You can then:
- Link skills to individual certificates (Course Administration > Certificates > Skills). When a certificate is earned, the user is automatically added, and they are removed when the certificate expires.
- Add skills manually from the user profile (admins only)
- Filter instructors by skills when scheduling instructor-led events
- Track all skills and levels in the new Skills report
Skills can also be managed via user import or API
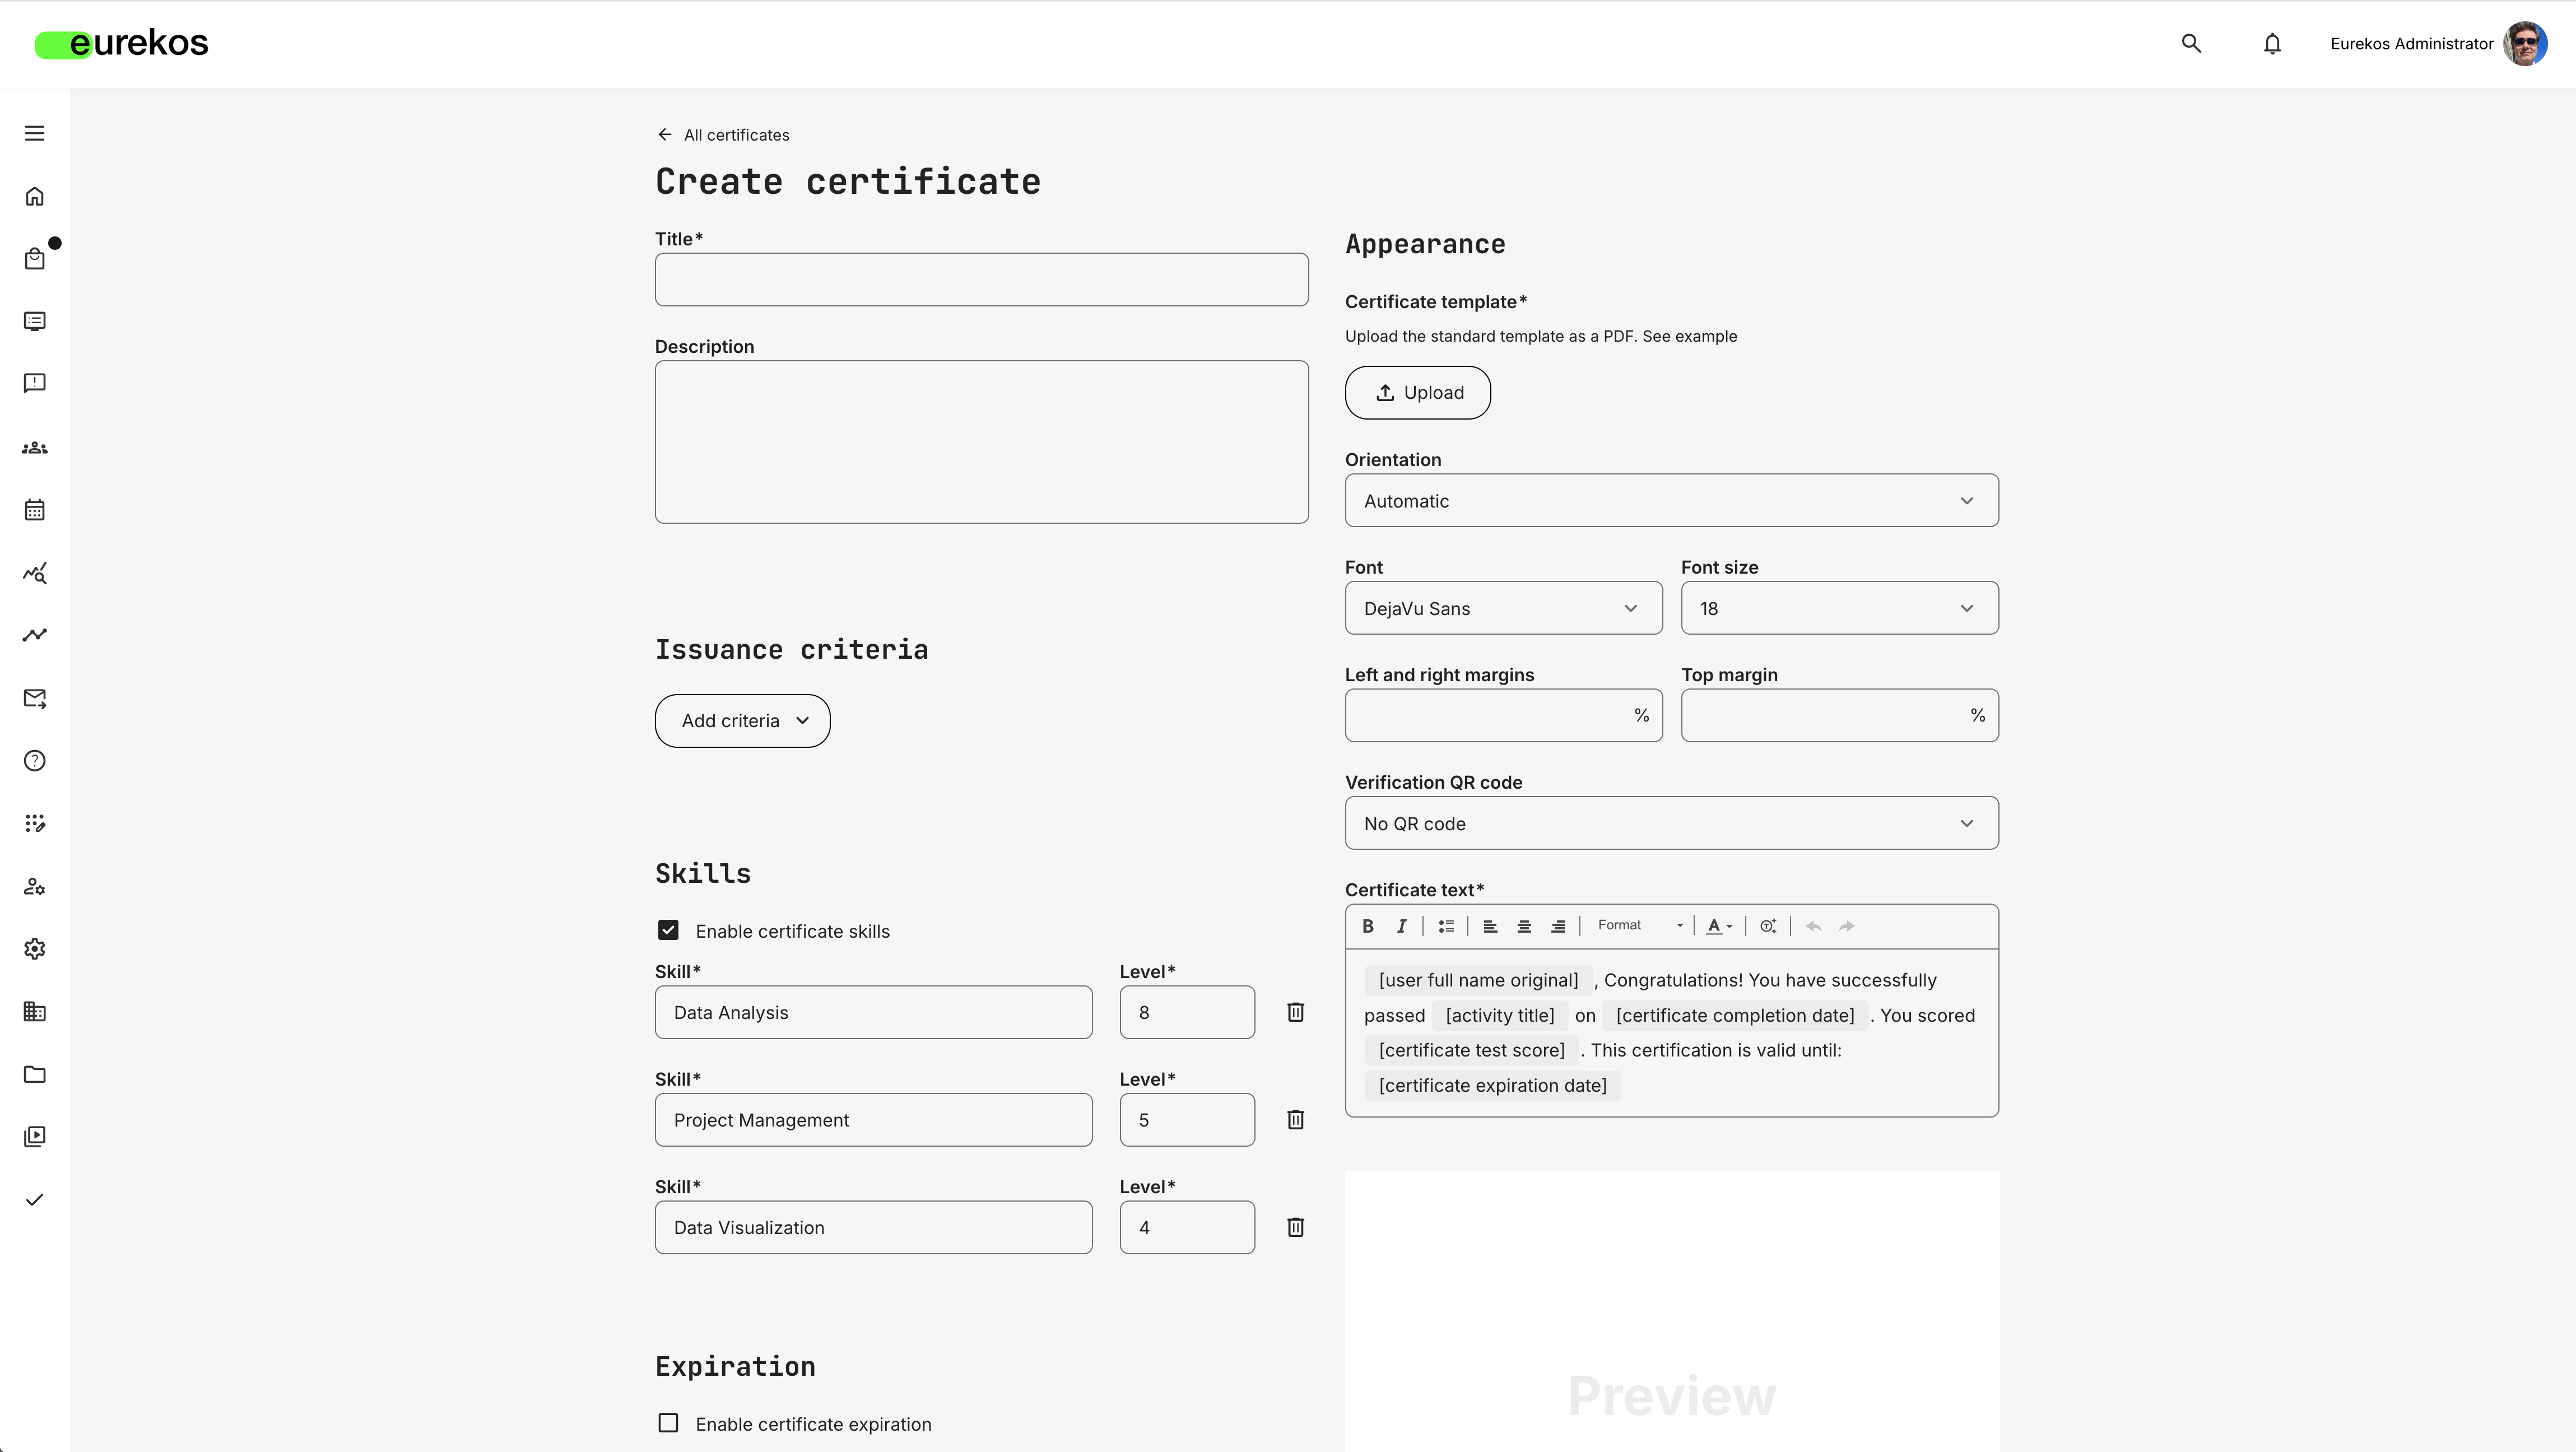
Skills can be directly linked to certificates, automatically granting learners specific skills (and corresponding levels) upon earning certificates.
Instructor Availability
To enhance thoughtful scheduling and resource coordination, we’ve introduced Instructor Availability, a new calendar-based tool that aids in managing instructor capacity and preventing scheduling conflicts. This tool brings greater transparency and structure to instructor scheduling.
Instructors can now proactively block off time for focus, travel, or leave by setting their availability directly on the platform. Admins can gain a comprehensive overview of the organization, making it easier to assign the right person to the event at the right time.
How it works
Instructor availability management can be enabled from Settings > General > Features for Instructors. Once enabled:
- Instructors see a new "My Availability" menu item.
- They can block time in a visual calendar (day/week/month view)
- Each time block includes a title and time range
- From Course Administration > Availability, admins can:
- View instructor availability across their organization
- Add/edit/delete availability blocks on behalf of instructors
- Filter availability by instructor profile fields (e.g. job function, organization, country)
If Microsoft Outlook synchronization is configured under Settings > Third Party Integrations, any time block created, updated, or deleted for an instructor will automatically sync with their Outlook calendar and arrive as an RSVP.
This facilitates large-scale scheduling across regions and roles, thereby enhancing cross-team coordination and instructor resource planning.
Instructors can now manage their availability through a visual calendar, facilitating coordination between instructors and administrators to avoid scheduling conflicts.
Shortlist of Additional Noticeable Changes:
- Organization is now available as a new trigger for Aaptive Modules: Organization is now a new trigger for Aaptive Modules. This allows you to configure Adaptive Modules using a user’s organization as a trigger. This feature expands the list of supported criteria for dynamically showing or hiding modules in a user’s learning path based on their profile, achievements, and performance.
- New cancellation and attendance reactivation options for calendar events: Calendar events now offer new cancellation and attendance reactivation options. Administrators and instructors can enable participants to cancel their own participation and set deadlines for cancellation and attendance reactivation when creating events directly through the Calendar. These settings are optional and do not apply to events created via Training Activities.
- “Other” response option for questionnaires: When configuring Single Choice, Dropdown, or Multiple Choice questions in a questionnaire, creators can now enable the “Option to provide own reply” setting. This allows respondents to select ‘Other’ and enter a custom response via a text field, providing greater flexibility when predefined answers don’t cover all scenarios. This new feature offers an alternative response option for questionnaires.
- Seat limits per organization - new "All organizations" option: Seat limits per organization have been added to the Registration Details feature in a Training Activity. You can now limit the number of participants that can register per organization. Additionally, there’s a new “All organizations” option when configuring this feature, making it easier to apply the same seat limit across all organizations at once.